> ## Documentation Index
> Fetch the complete documentation index at: https://developer.dashsocial.com/llms.txt
> Use this file to discover all available pages before exploring further.
# mcp-wip
> Installing the Dash Social MCP, how you can use it, and tips for getting reliable results.
Bring your brand's intelligence directly into the AI tools you're already working in, without stitching together exports or toggling between tabs. The Dash Social MCP allows you to connect your brand’s performance data, competitive benchmarks, community insights, and more into your chosen AI platform like ChatGPT or Claude, so you can build custom workflows and access insights.
This guide covers how to install the MCP and how you can use it as the default social data layer inside the AI platforms your team is using.
***
## What is MCP?
Model Context Protocol (MCP) is an open standard that allows AI applications like ChatGPT or Claude to securely access external data sources and tools. The Dash Social MCP server provides AI assistants with direct access to your brand’s metrics, posts, and community data.
When you connect the Dash Social MCP, your AI assistant can pull your Dash data based on natural-language questions about social performance. You can also use it to build custom workflows across other tools you’ve connected to your AI assistant, such as Google Drive or Slack.
***
## How You Can Use It
Here are a few ways teams are already using the Dash Social MCP to elevate their social media management:
* **Performance Reporting:** Ask your AI assistant to pull the latest data from Dash and populate your team's reporting template, then share it via Slack once it's approved. No more manual data pulls.
* **Post Performance and Creative Intelligence:** Dig into post-level data across channels, including owned and UGC content. Analyze performance by post type, format, and theme without building manual reports.
* **Community Insights:** Surface what your audience is saying. The MCP gives you access to comment and DM data, top keywords, sentiment breakdowns, and community overview metrics — all read-only, so nothing gets changed without your intent.
* **Competitive Research:** Ask your AI assistant to research your brand's positioning and public perception with Dash's competitive benchmarks and industry data built right in.
* **Content Scheduling:** Identify gaps in your calendar, pull assets from your content library or upload new ones, draft them into posts across brands and channels, and schedule directly into Dash at your best times to post.
These are just a few ideas to get you started, but the only limit is your imagination!
***
## Before You Start
**Check with your IT team first.** Setup is often handled by an admin and many organizations restrict which AI clients and connectors employees can use. Confirm which of the clients below are approved at your company before you start.
In order to connect the Dash Social MCP, make sure you have:
* A Dash Social account with access to the brands you want to use.
* An MCP client that supports remote MCP servers, such as Claude or ChatGPT.
Some AI platforms may limit MCP integrations to specific plans.
***
## Connecting the MCP
The Dash Social MCP is a remote server, so there is nothing to "install" locally. All you need to do is connect your AI client to the server URL and authenticate with your Dash account!
If your admin has already set up the Dash Social connector, you can skip the setup steps below. Just find "Dash Social" in your connectors/apps list and add it to your account.
The Dash Social MCP is available with the Premium Analytics add-on and mirrors your existing Dash Social permissions. Your AI assistant can only access the brands and features you already have in Dash Social.
Server URL:
```text theme={null}
https://mcp.dashsocial.com/mcp
```
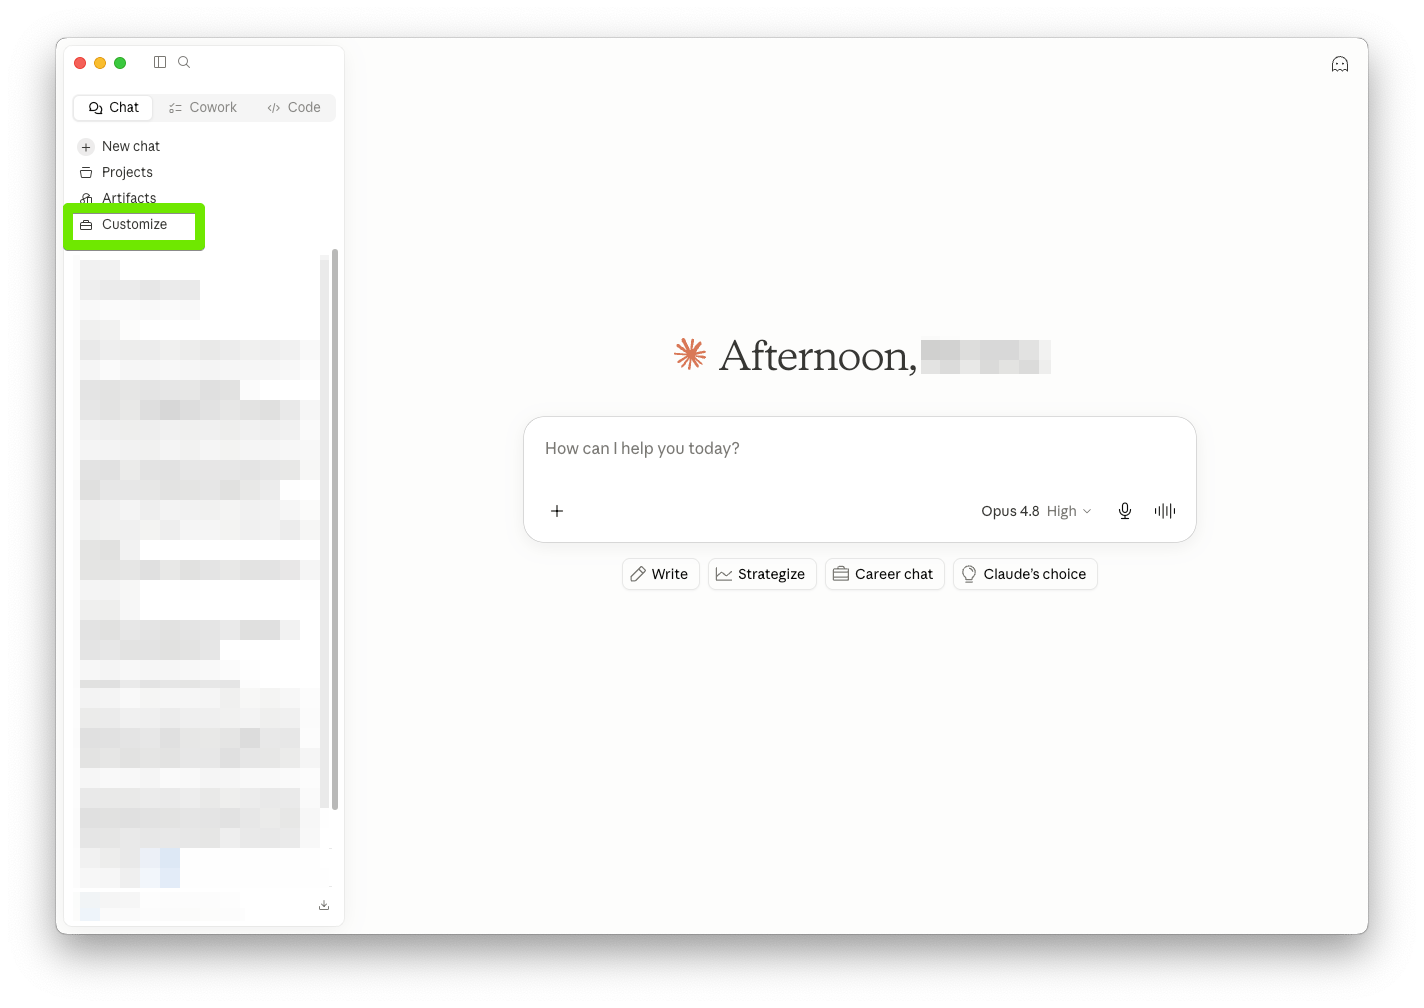
Open **Customize**, then **Connectors**.
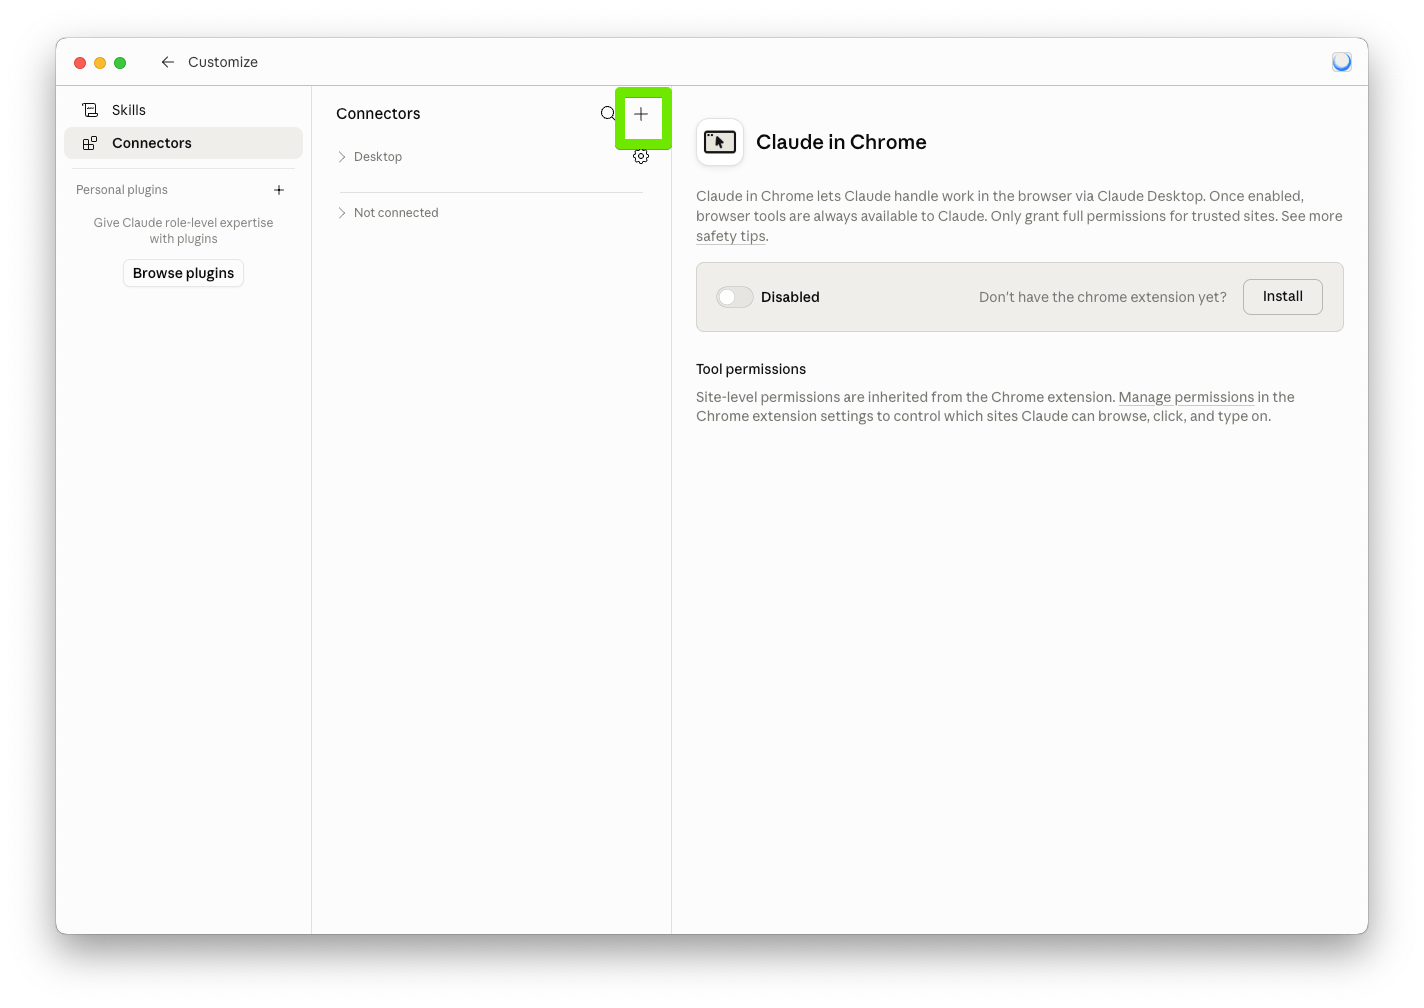
 Click the **+** button → **Custom connector**.
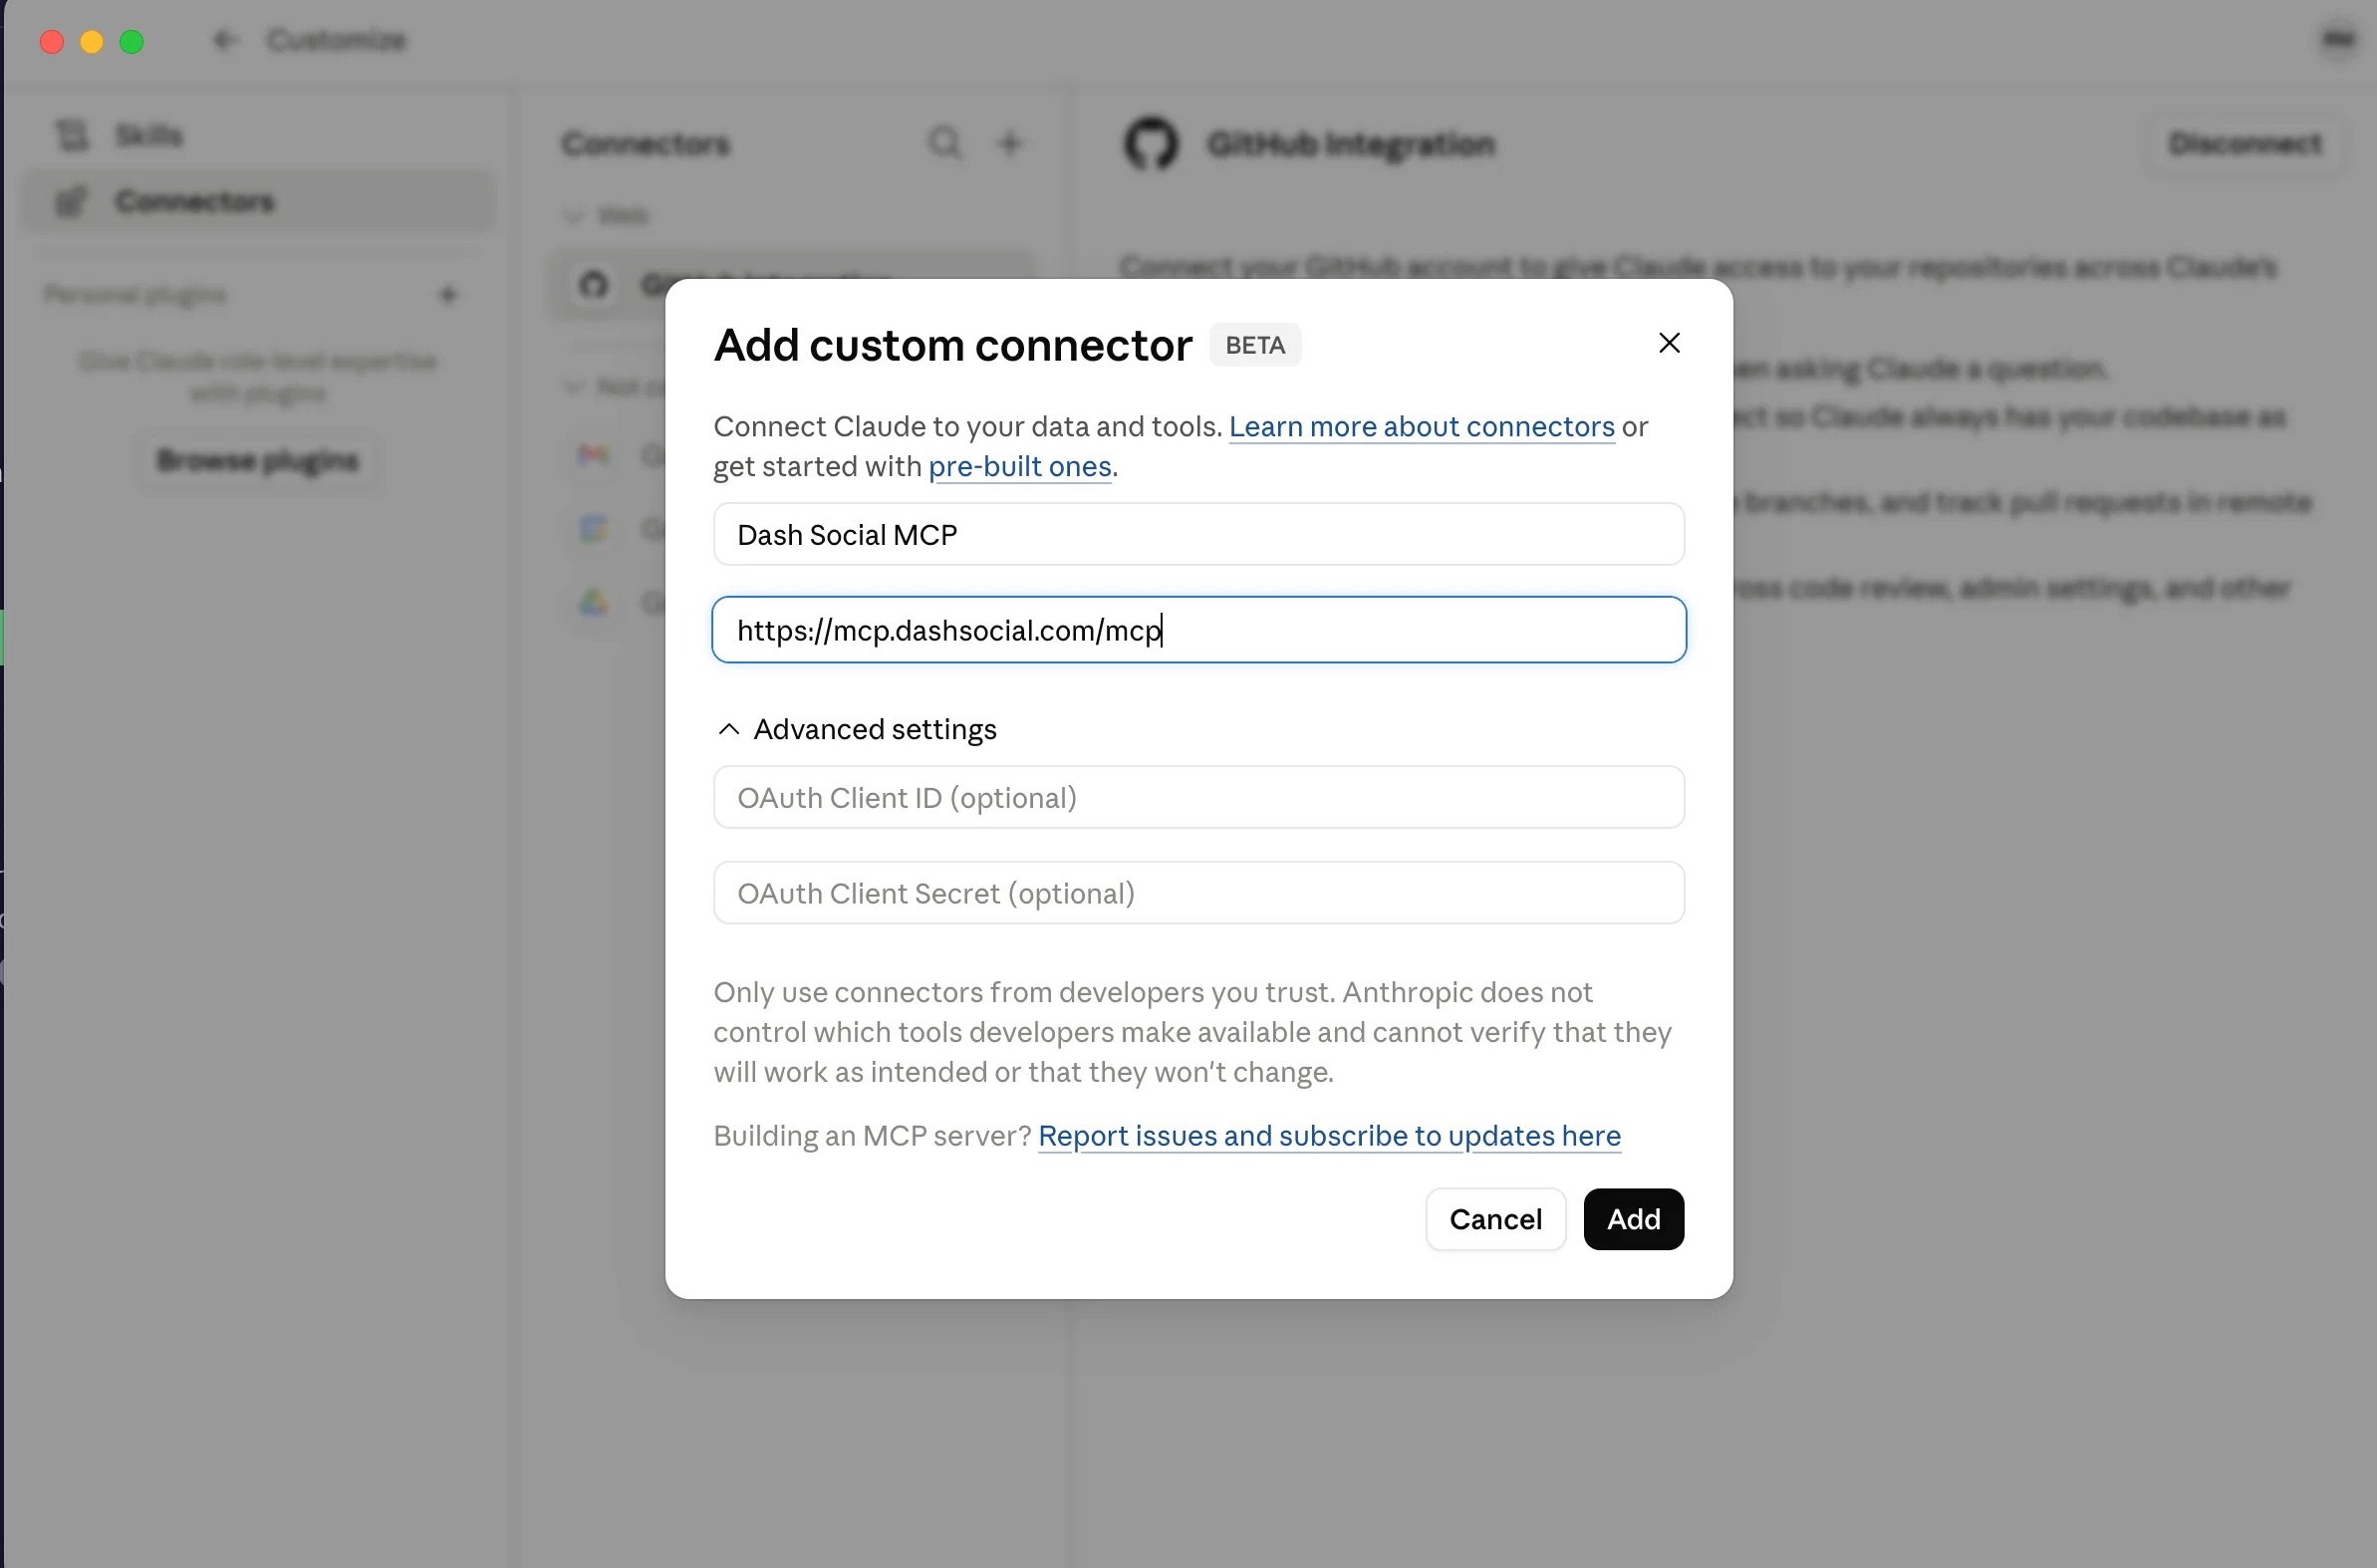
 Name it "Dash Social MCP", paste the server URL above and click **Connect**.
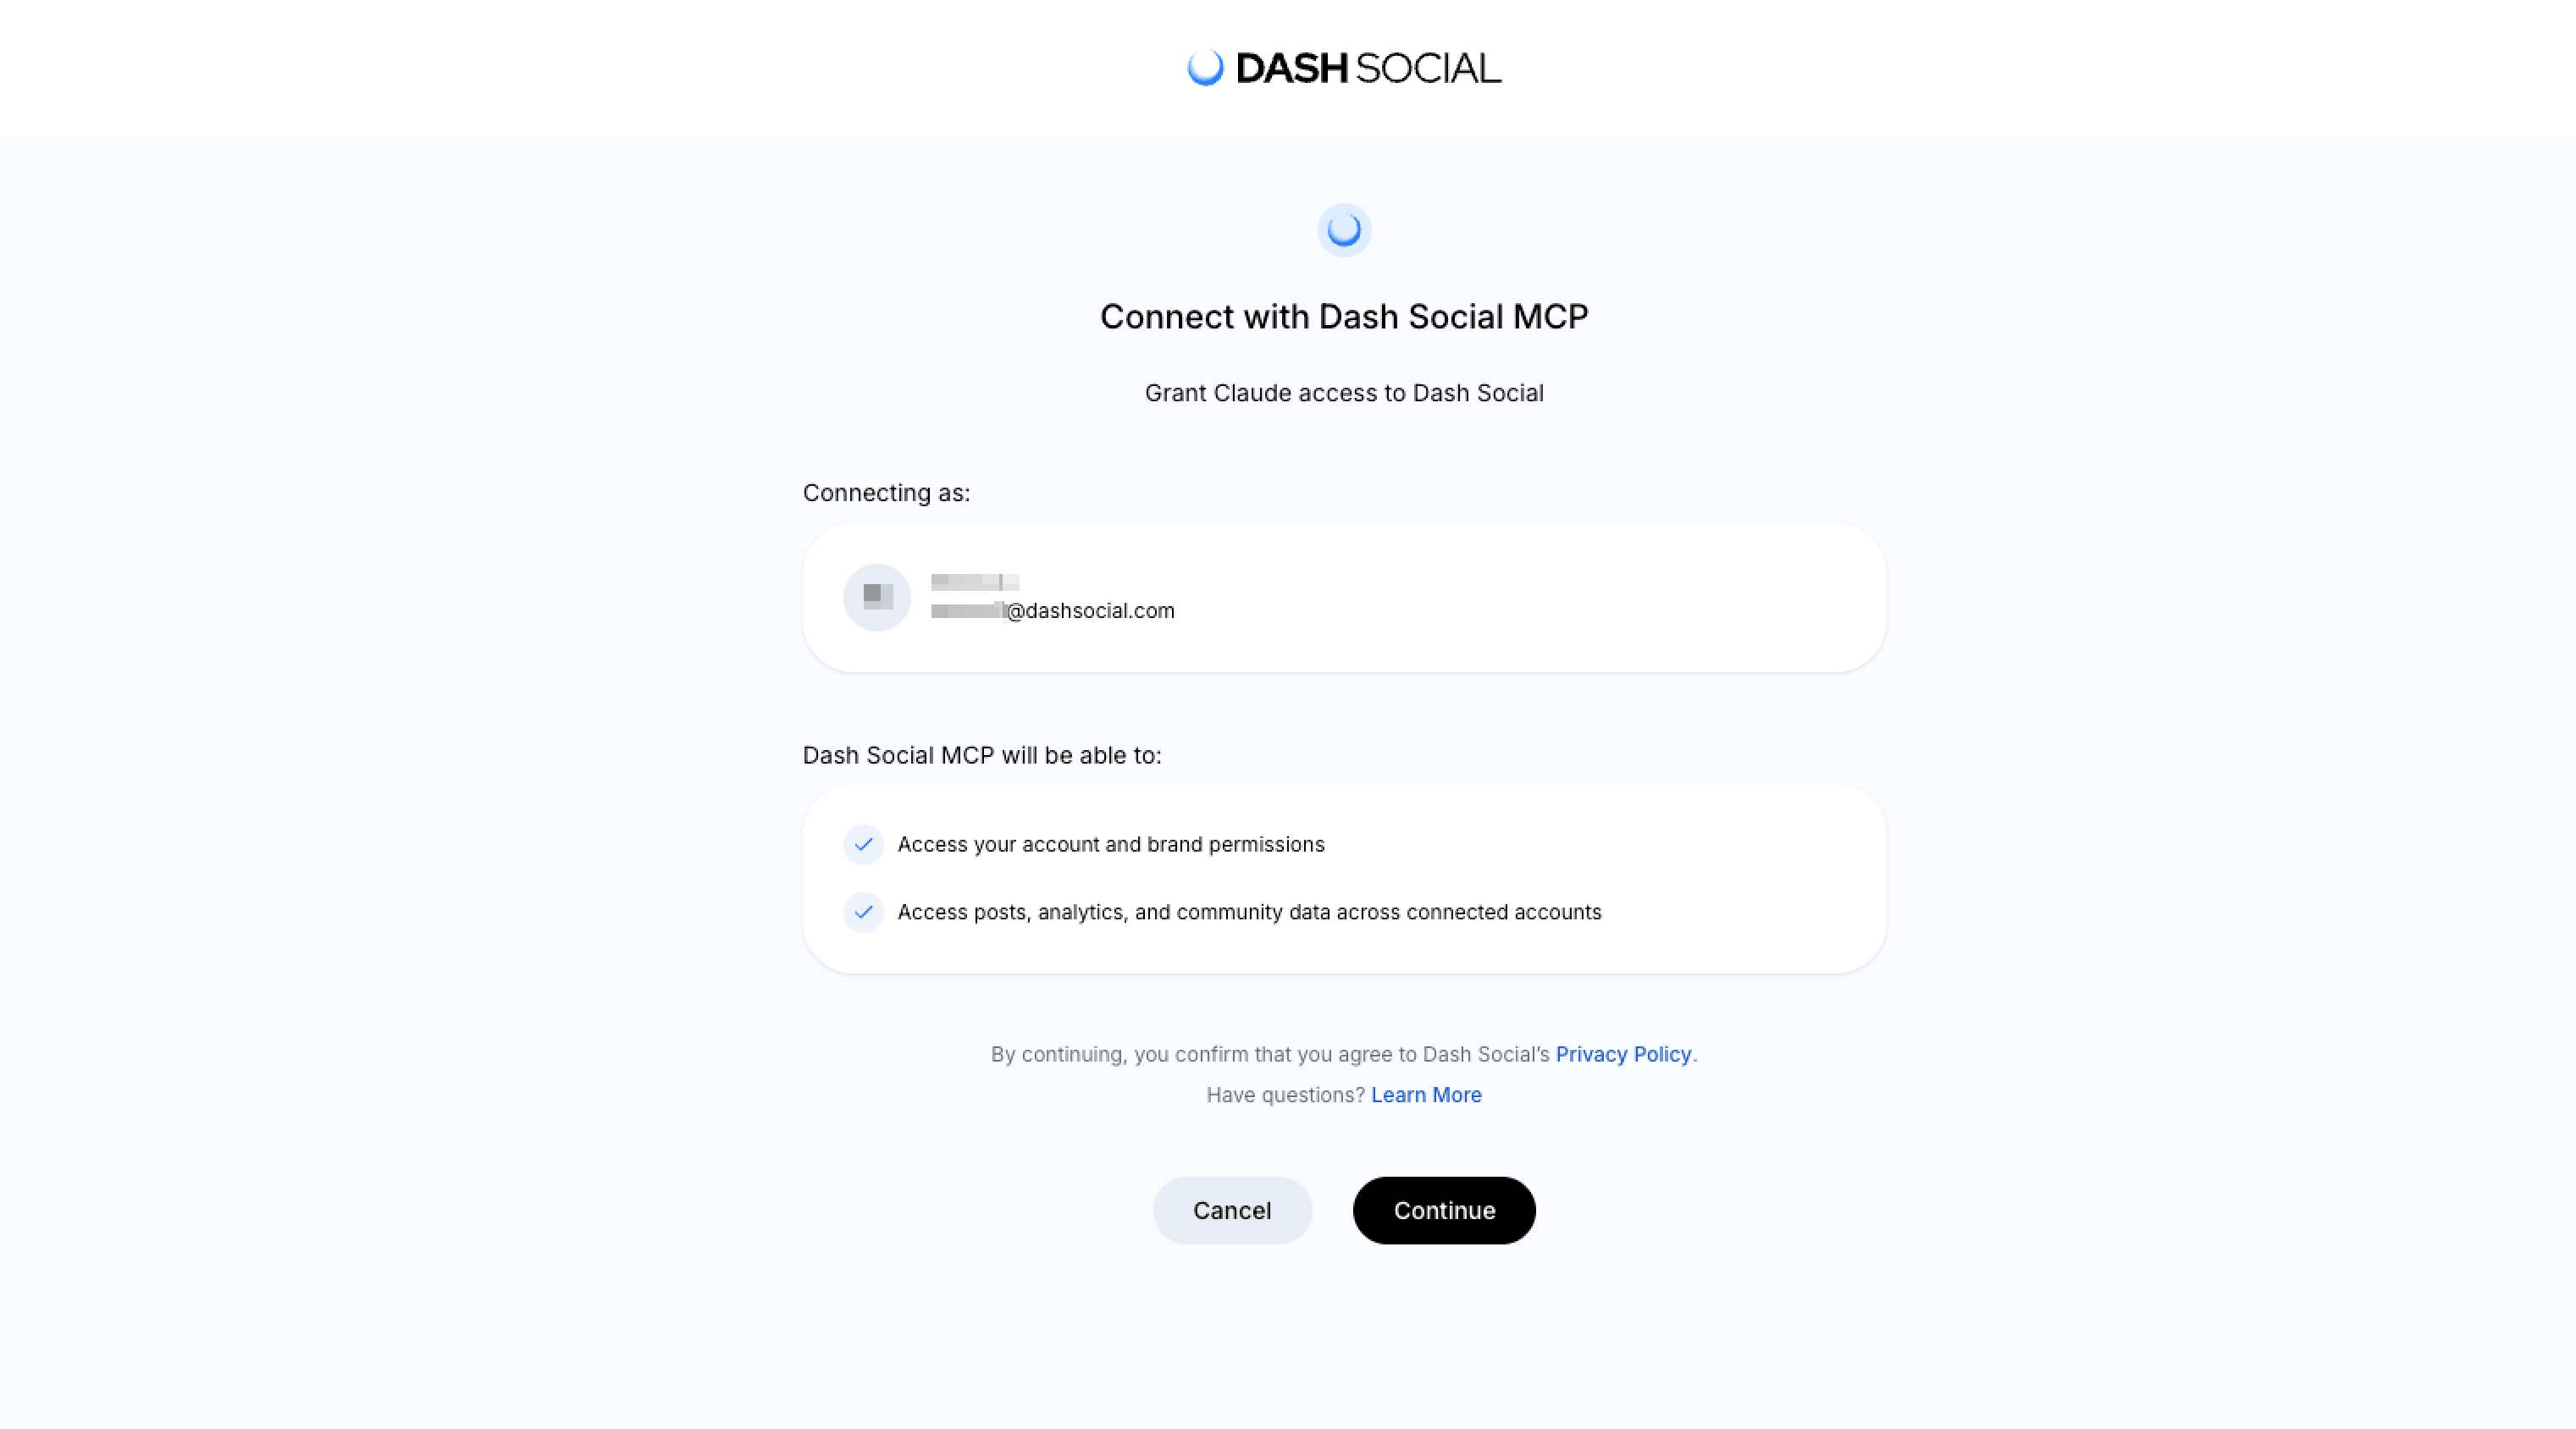
 Complete the authentication prompt to link your Dash Social account.
 The Dash Social tools are now available in your conversations.
"Pro" models (o1-pro, o3-pro) are not supported with Custom Apps. Use standard models like GPT-4o instead.
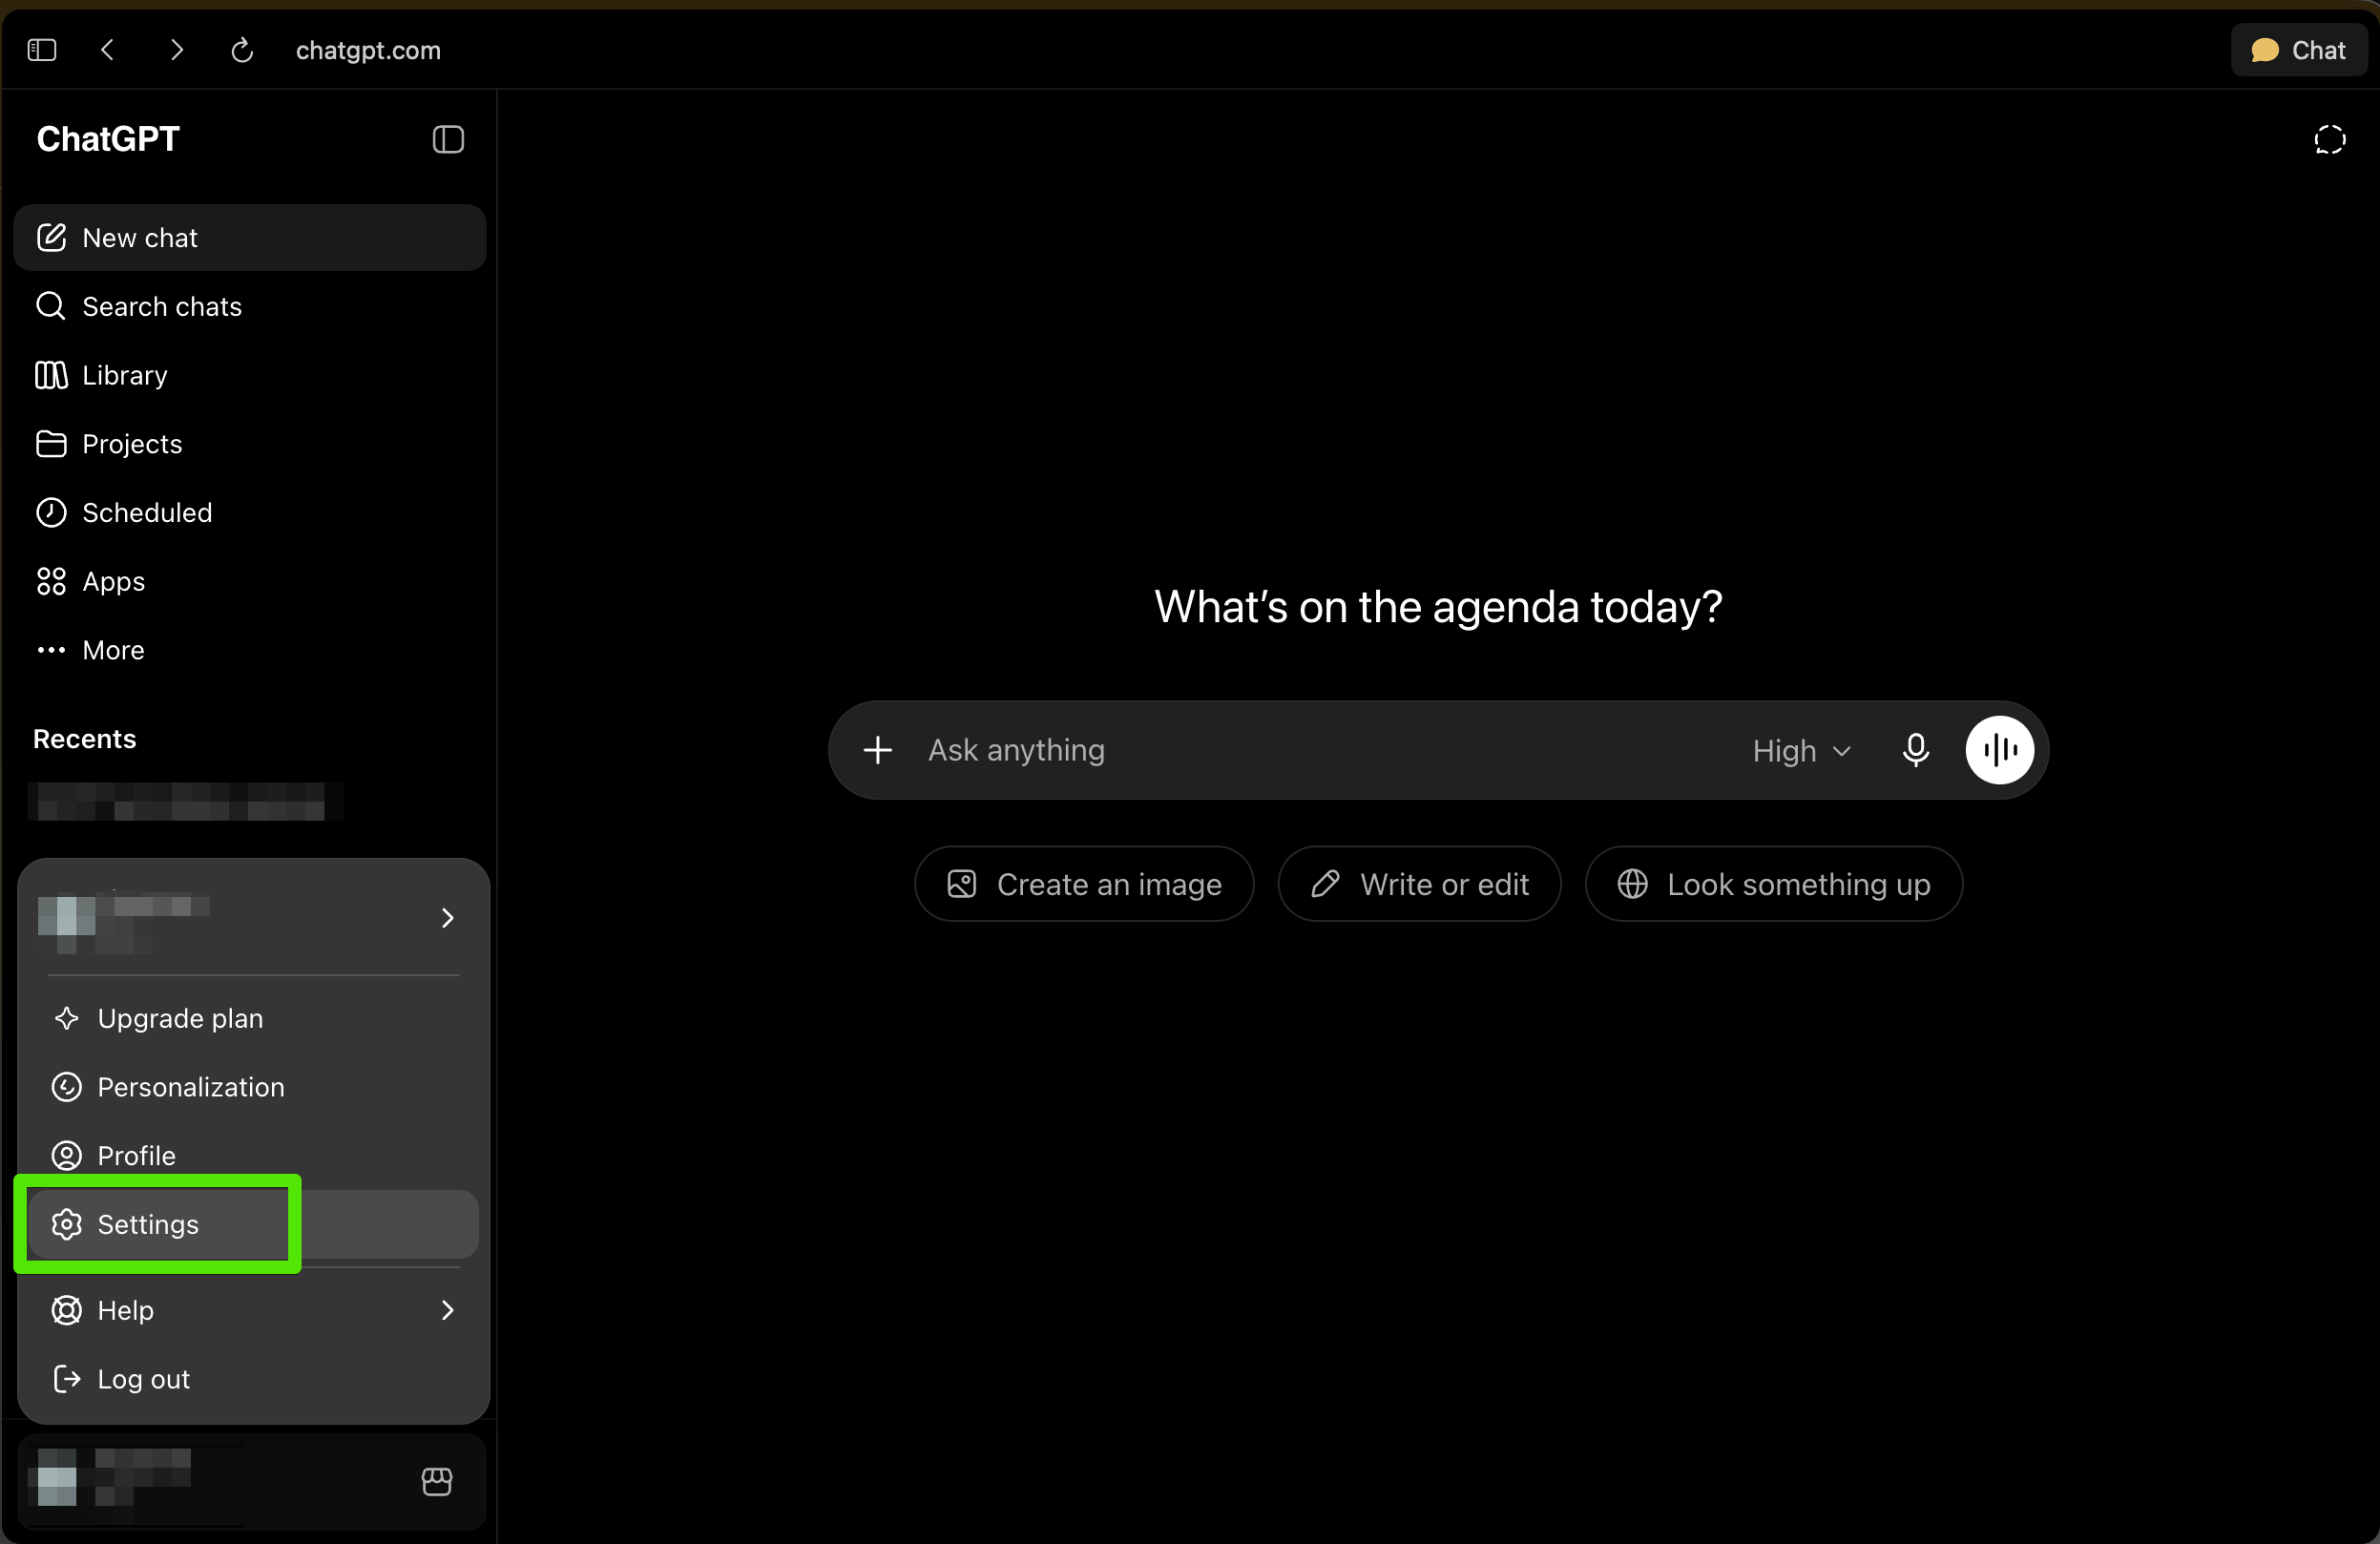
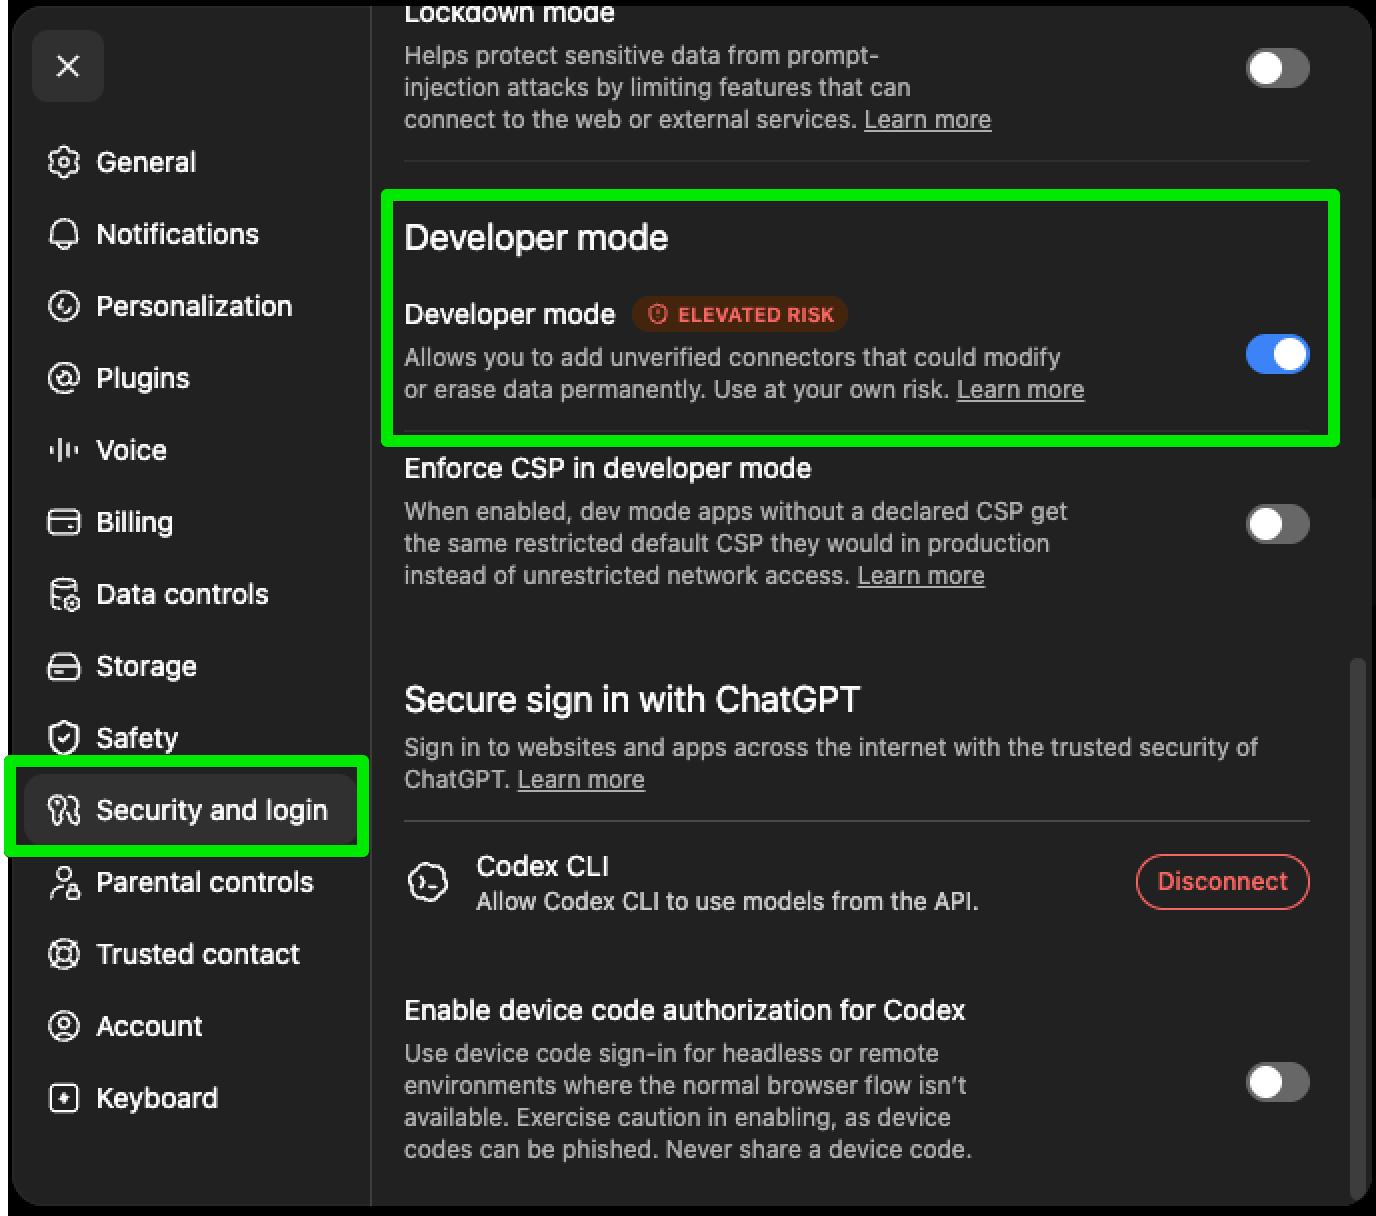
Open **Settings** → **Security and log in** → **Developer mode**. Toggle Developer mode.
The Dash Social tools are now available in your conversations.
"Pro" models (o1-pro, o3-pro) are not supported with Custom Apps. Use standard models like GPT-4o instead.
Open **Settings** → **Security and log in** → **Developer mode**. Toggle Developer mode.
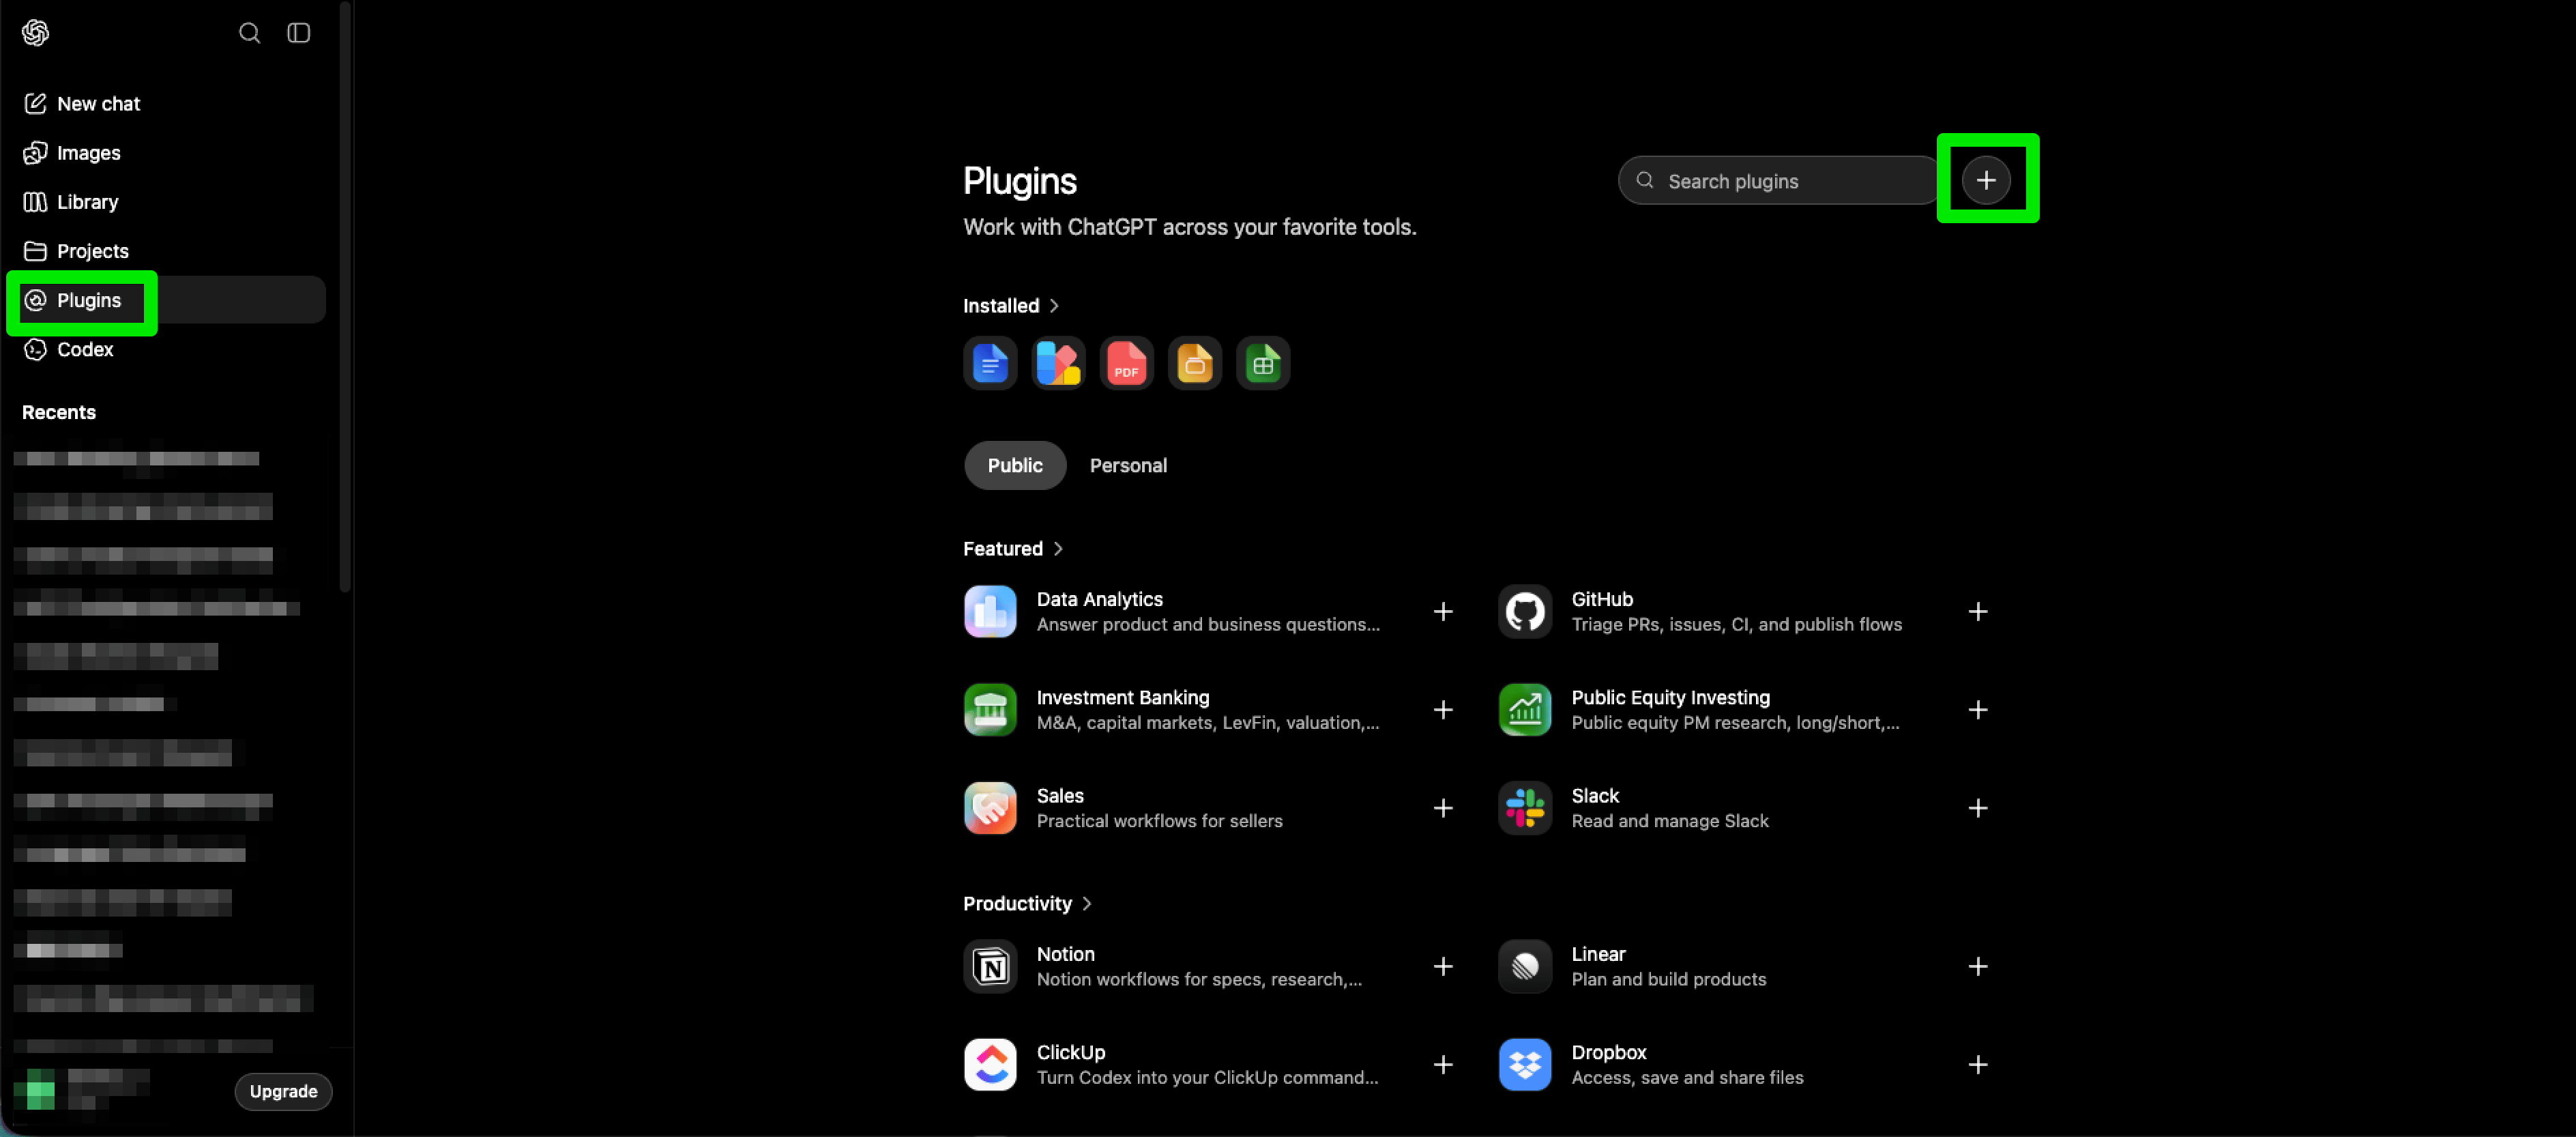
 Return to the main page and open **Plugins**. Click the **+** sign to create a new plugin.
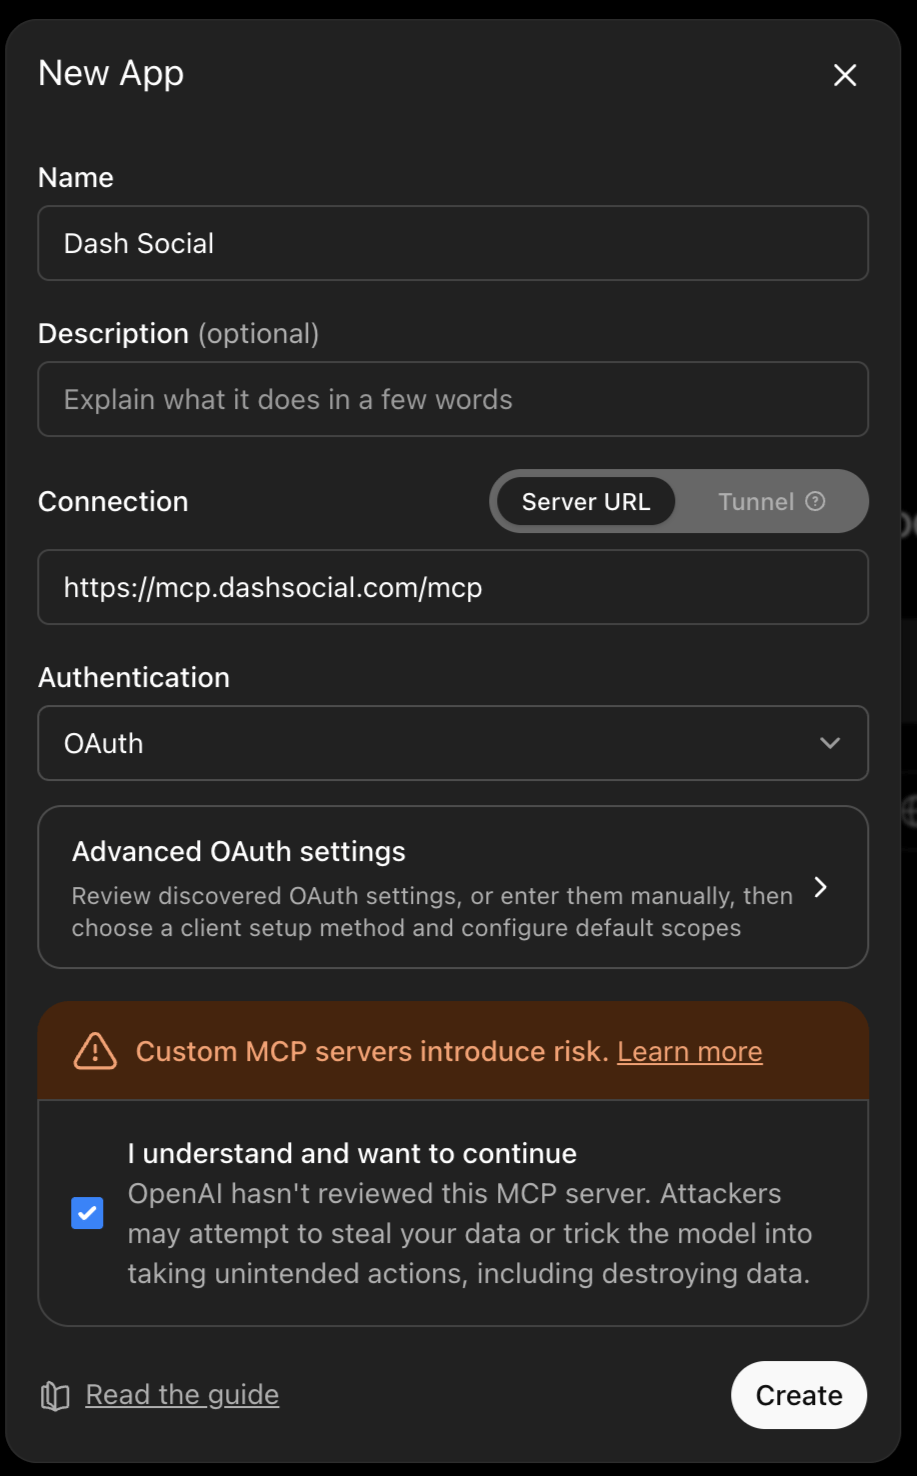
 Name it "Dash Social MCP", paste the server URL above, and click **Create**.
 Complete the authentication prompt to link your Dash Social account.
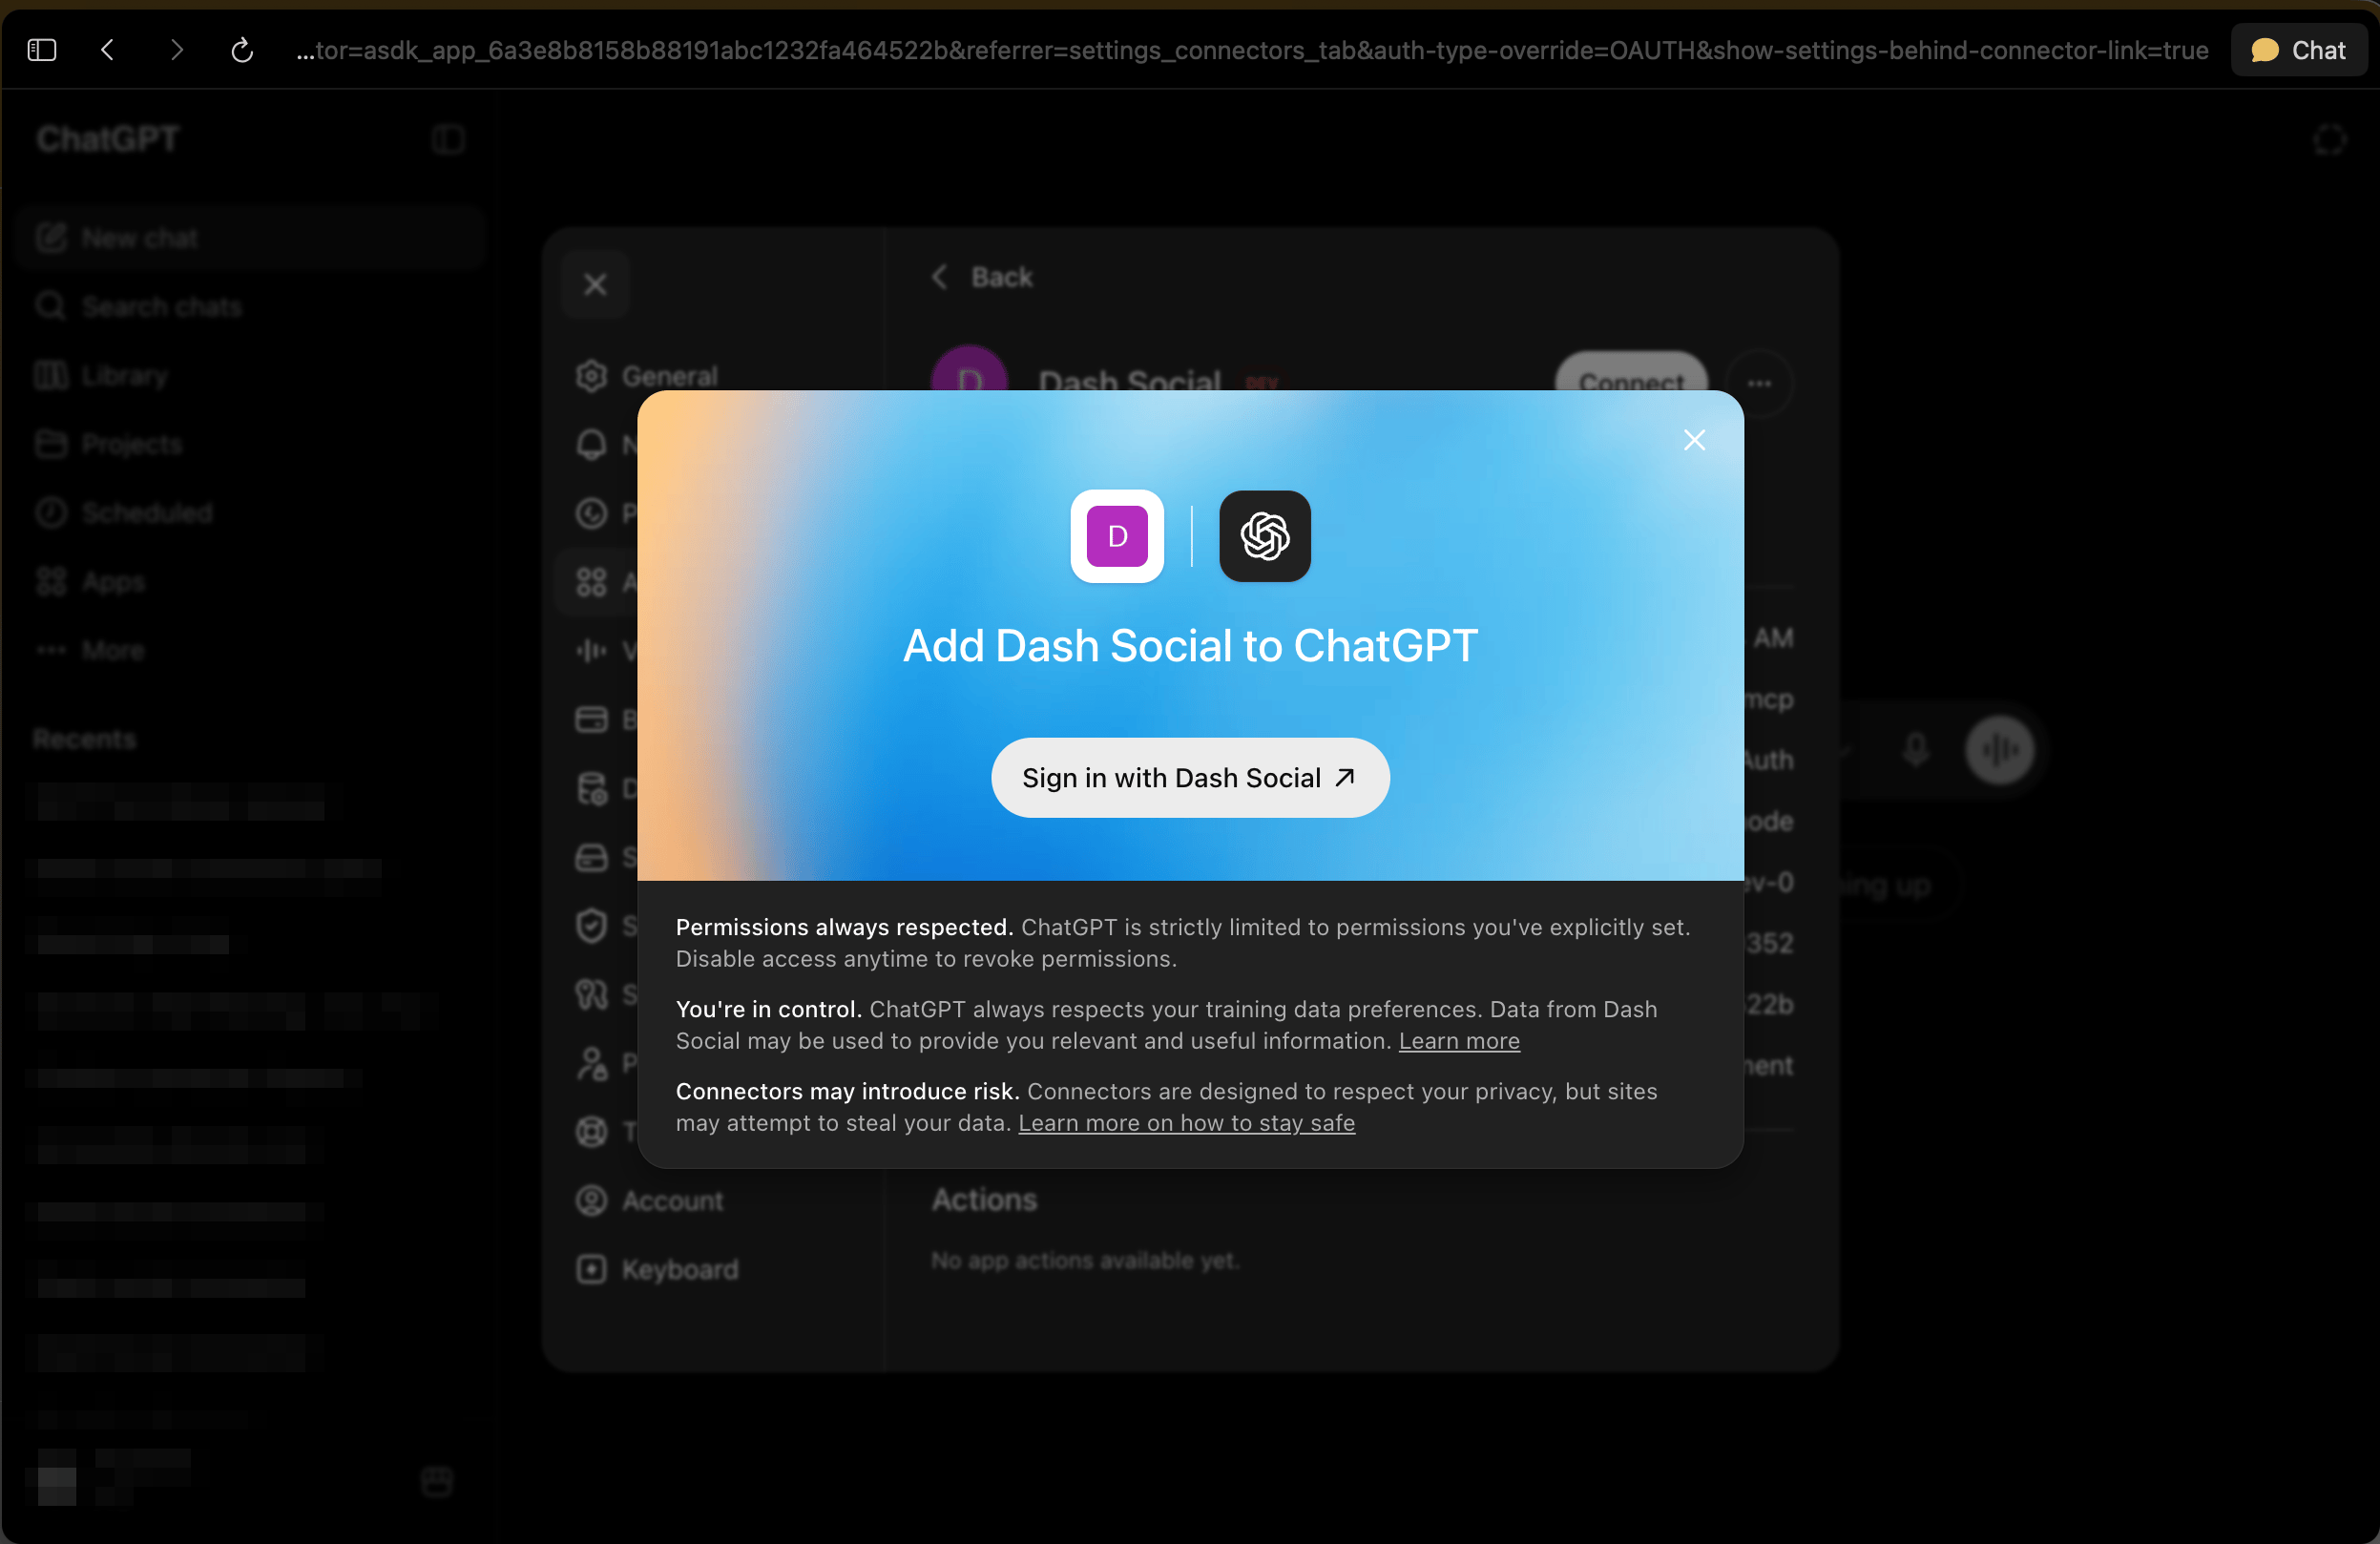 The Dash Social tools are now available in your conversations.
Microsoft 365 Copilot **Premium** is required. The standard Copilot subscription does not support MCP connections.
{" "}
Microsoft does not support dynamic client registration, so Dash Social provisions a **client ID** and **client secret** for each customer. Contact your account representative to get yours before starting.
### Part 1: IT admin setup
Open the **Teams Developer Portal** and go to **Tools** → **OAuth client registration**.
The Dash Social tools are now available in your conversations.
Microsoft 365 Copilot **Premium** is required. The standard Copilot subscription does not support MCP connections.
{" "}
Microsoft does not support dynamic client registration, so Dash Social provisions a **client ID** and **client secret** for each customer. Contact your account representative to get yours before starting.
### Part 1: IT admin setup
Open the **Teams Developer Portal** and go to **Tools** → **OAuth client registration**.
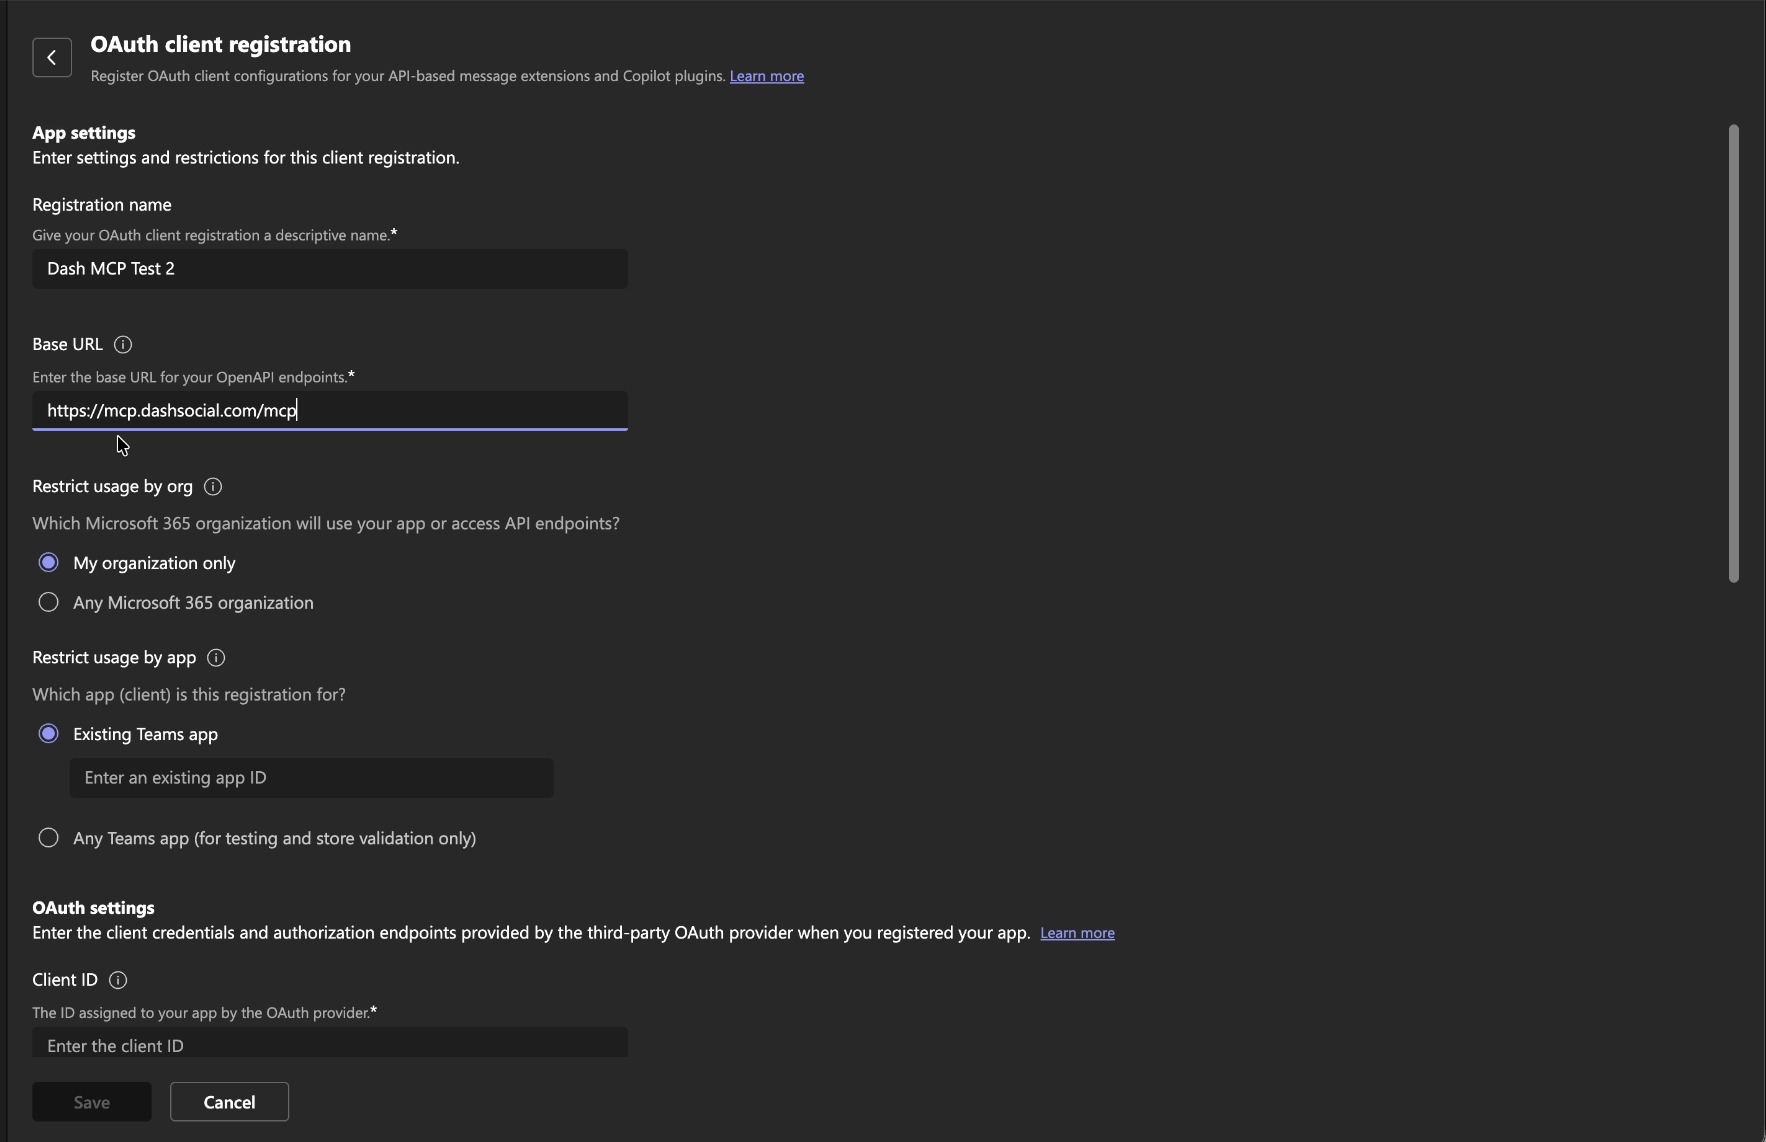
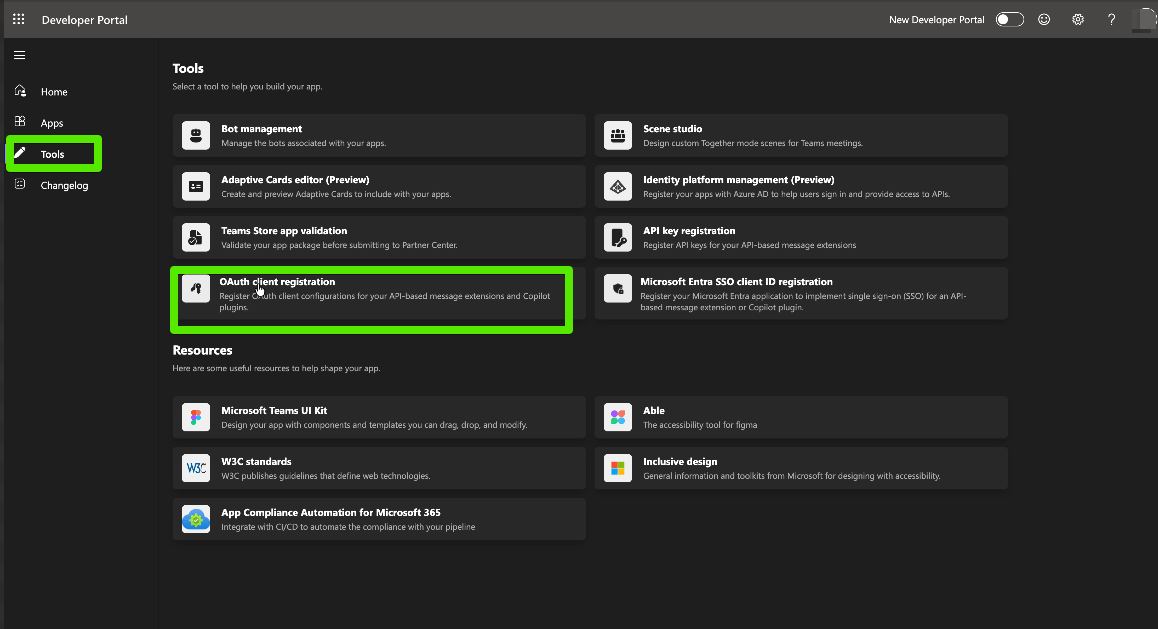 Click **New registration** and give it a name such as "Dash Social MCP". Enter the Dash Social MCP server URL, then set availability to **My organization only**.
 Enter the client ID and client secret provided by Dash Social.
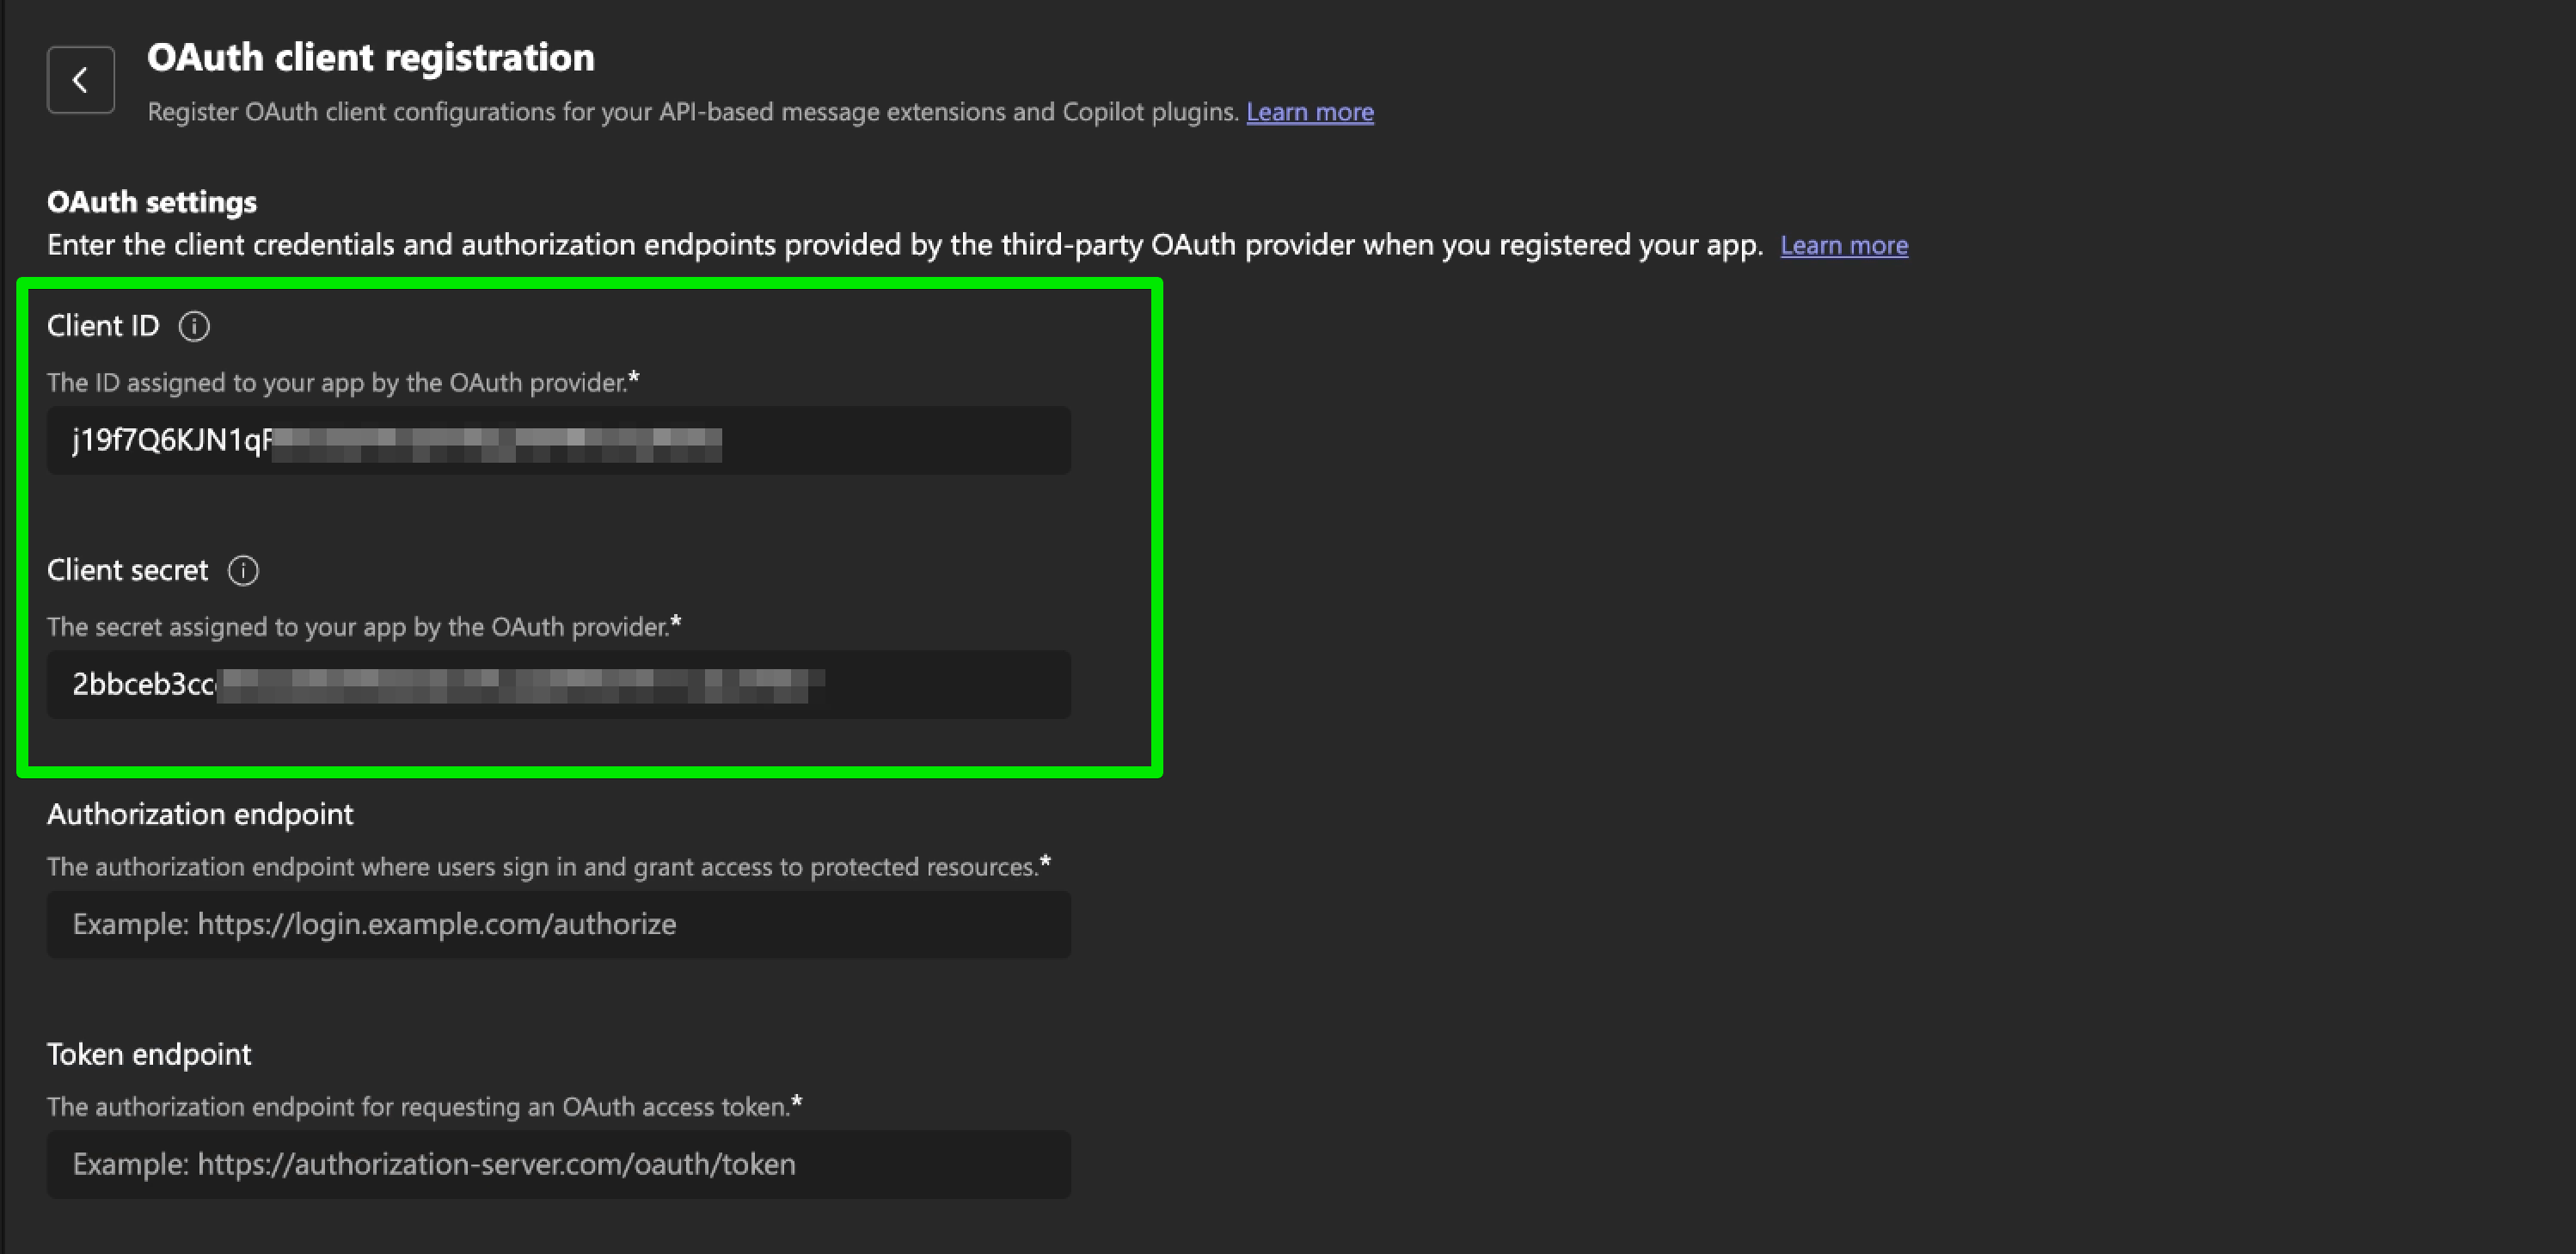 Enter the following endpoints. The refresh endpoint is the same as the token endpoint.
| Field | Value |
| ---------------------- | --------------------------------------------- |
| Authorization endpoint | `https://auth.dashsocial.com/oauth/authorize` |
| Token endpoint | `https://auth.dashsocial.com/oauth/token` |
| Refresh endpoint | `https://auth.dashsocial.com/oauth/token` |
Add `mcp:read` and `mcp:write` as the scopes. Leave **Client password authentication method** set to its default, **Request body parameters**.
Enter the following endpoints. The refresh endpoint is the same as the token endpoint.
| Field | Value |
| ---------------------- | --------------------------------------------- |
| Authorization endpoint | `https://auth.dashsocial.com/oauth/authorize` |
| Token endpoint | `https://auth.dashsocial.com/oauth/token` |
| Refresh endpoint | `https://auth.dashsocial.com/oauth/token` |
Add `mcp:read` and `mcp:write` as the scopes. Leave **Client password authentication method** set to its default, **Request body parameters**.
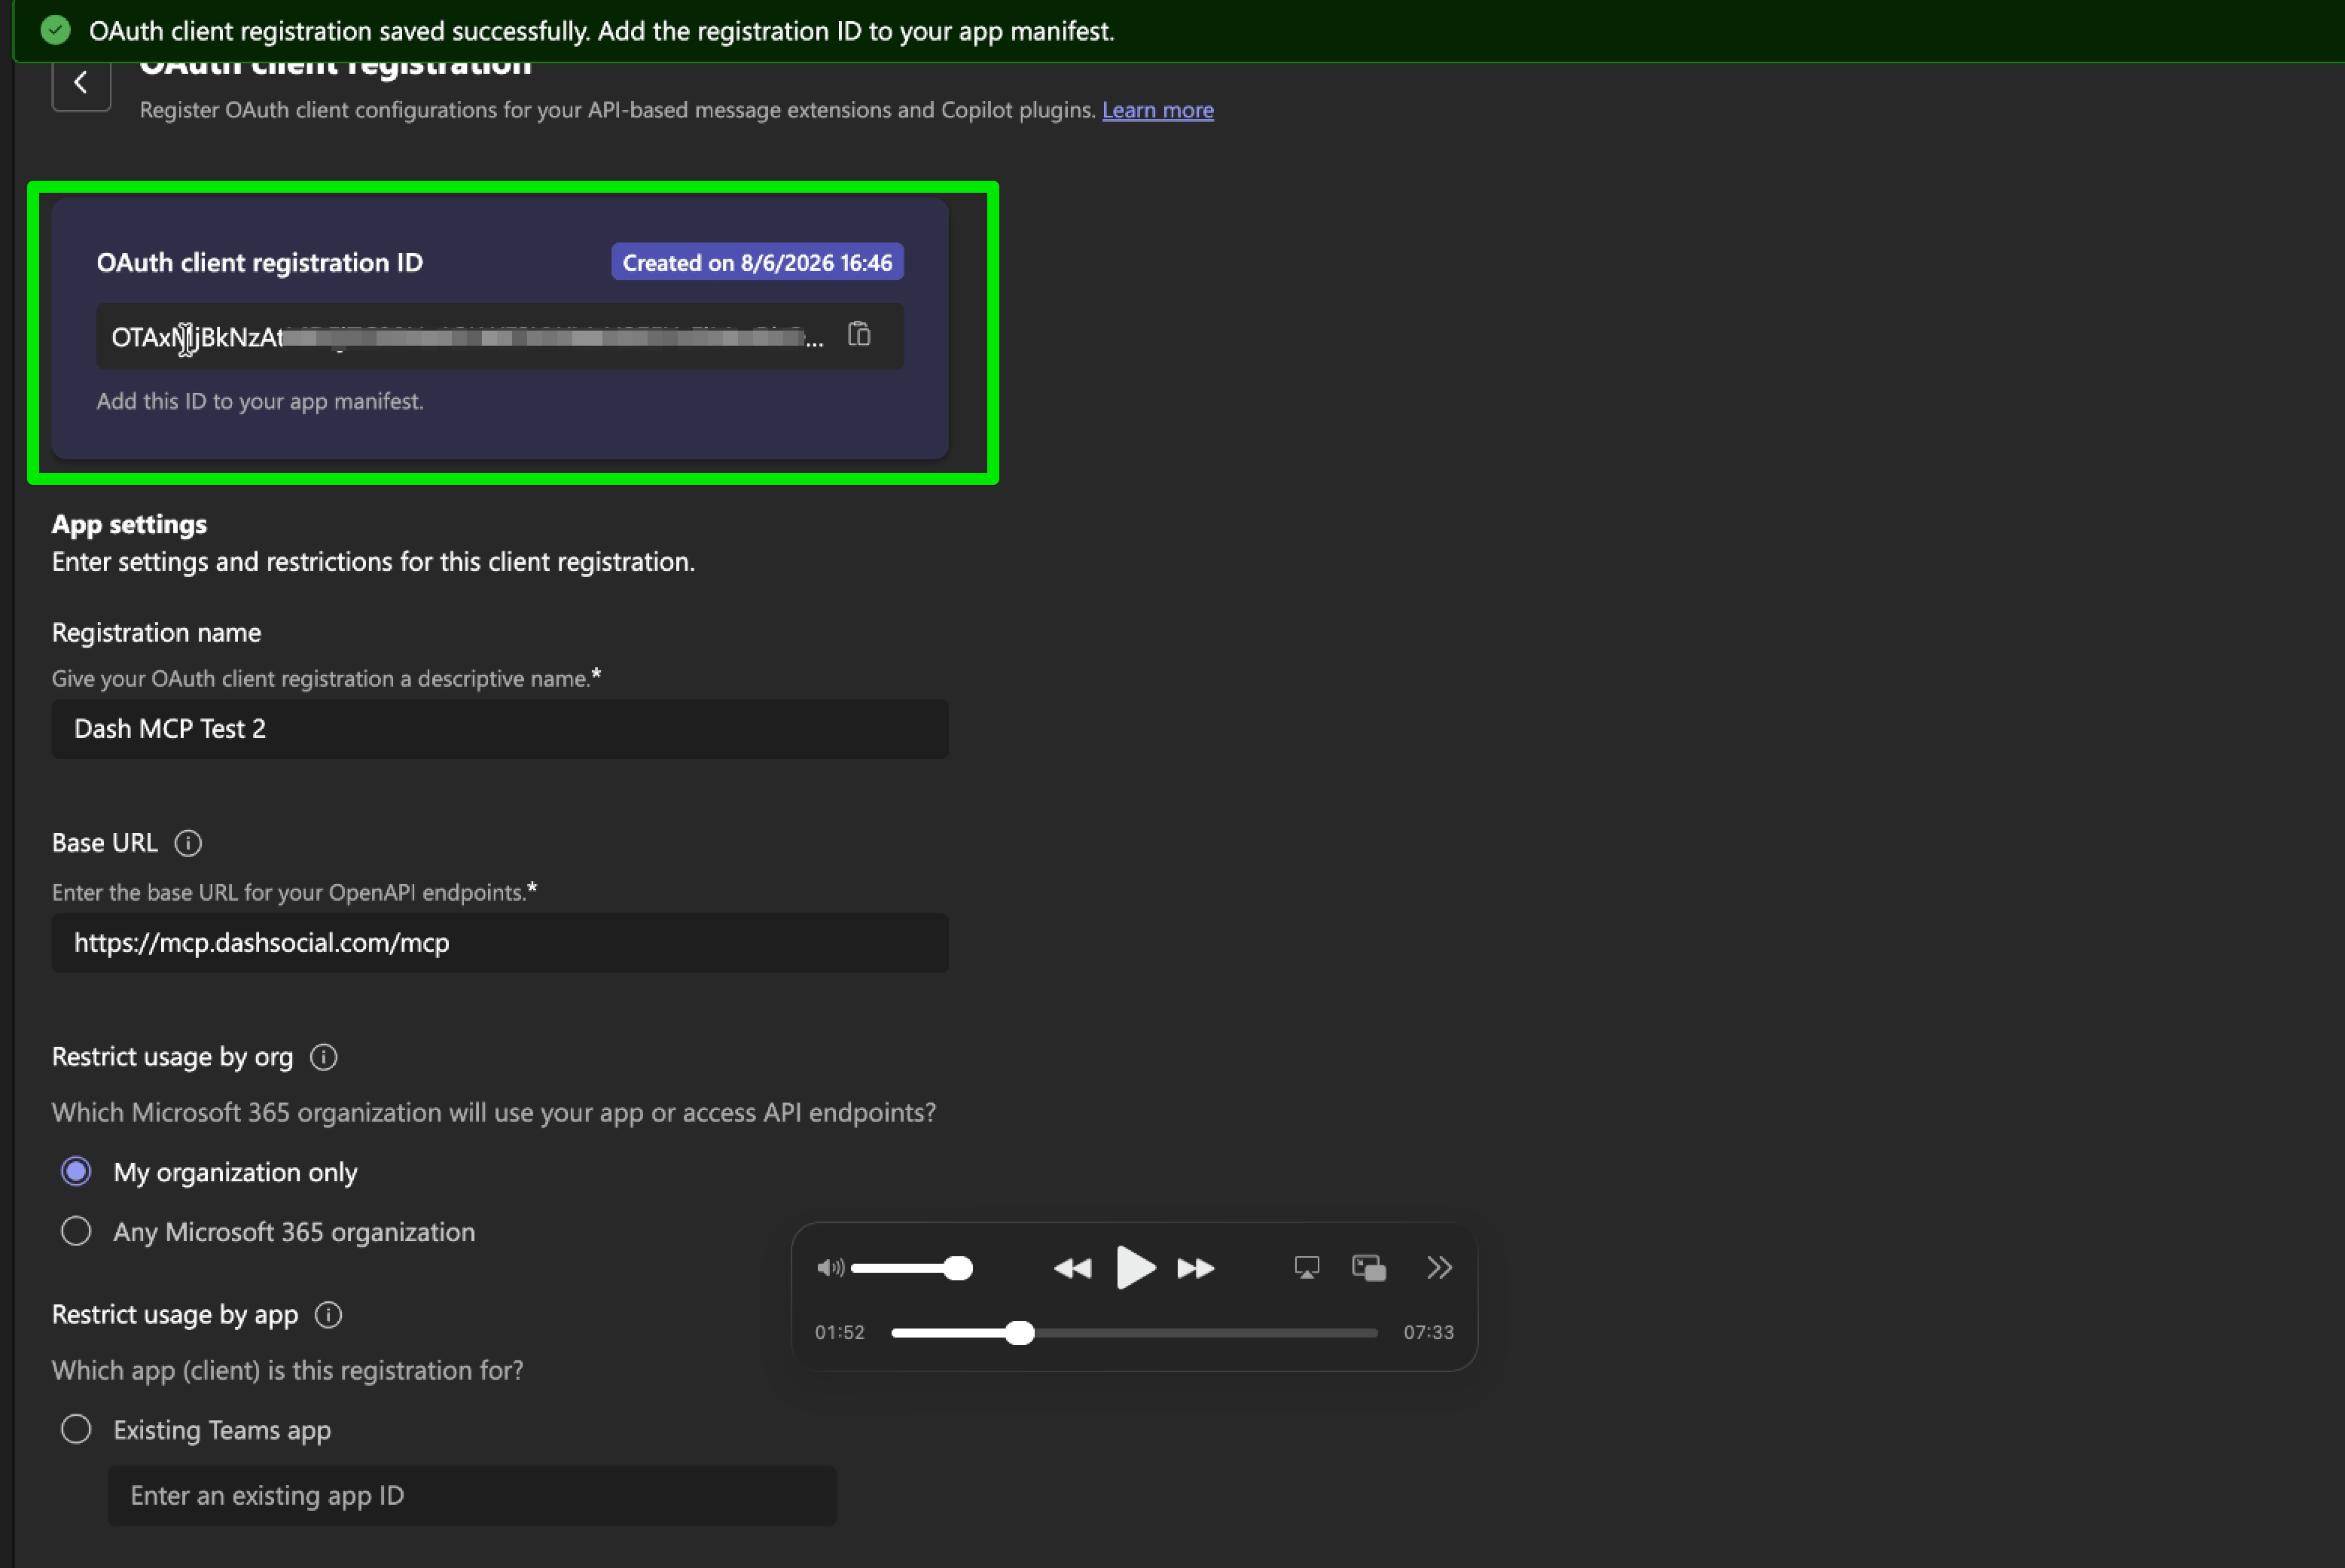
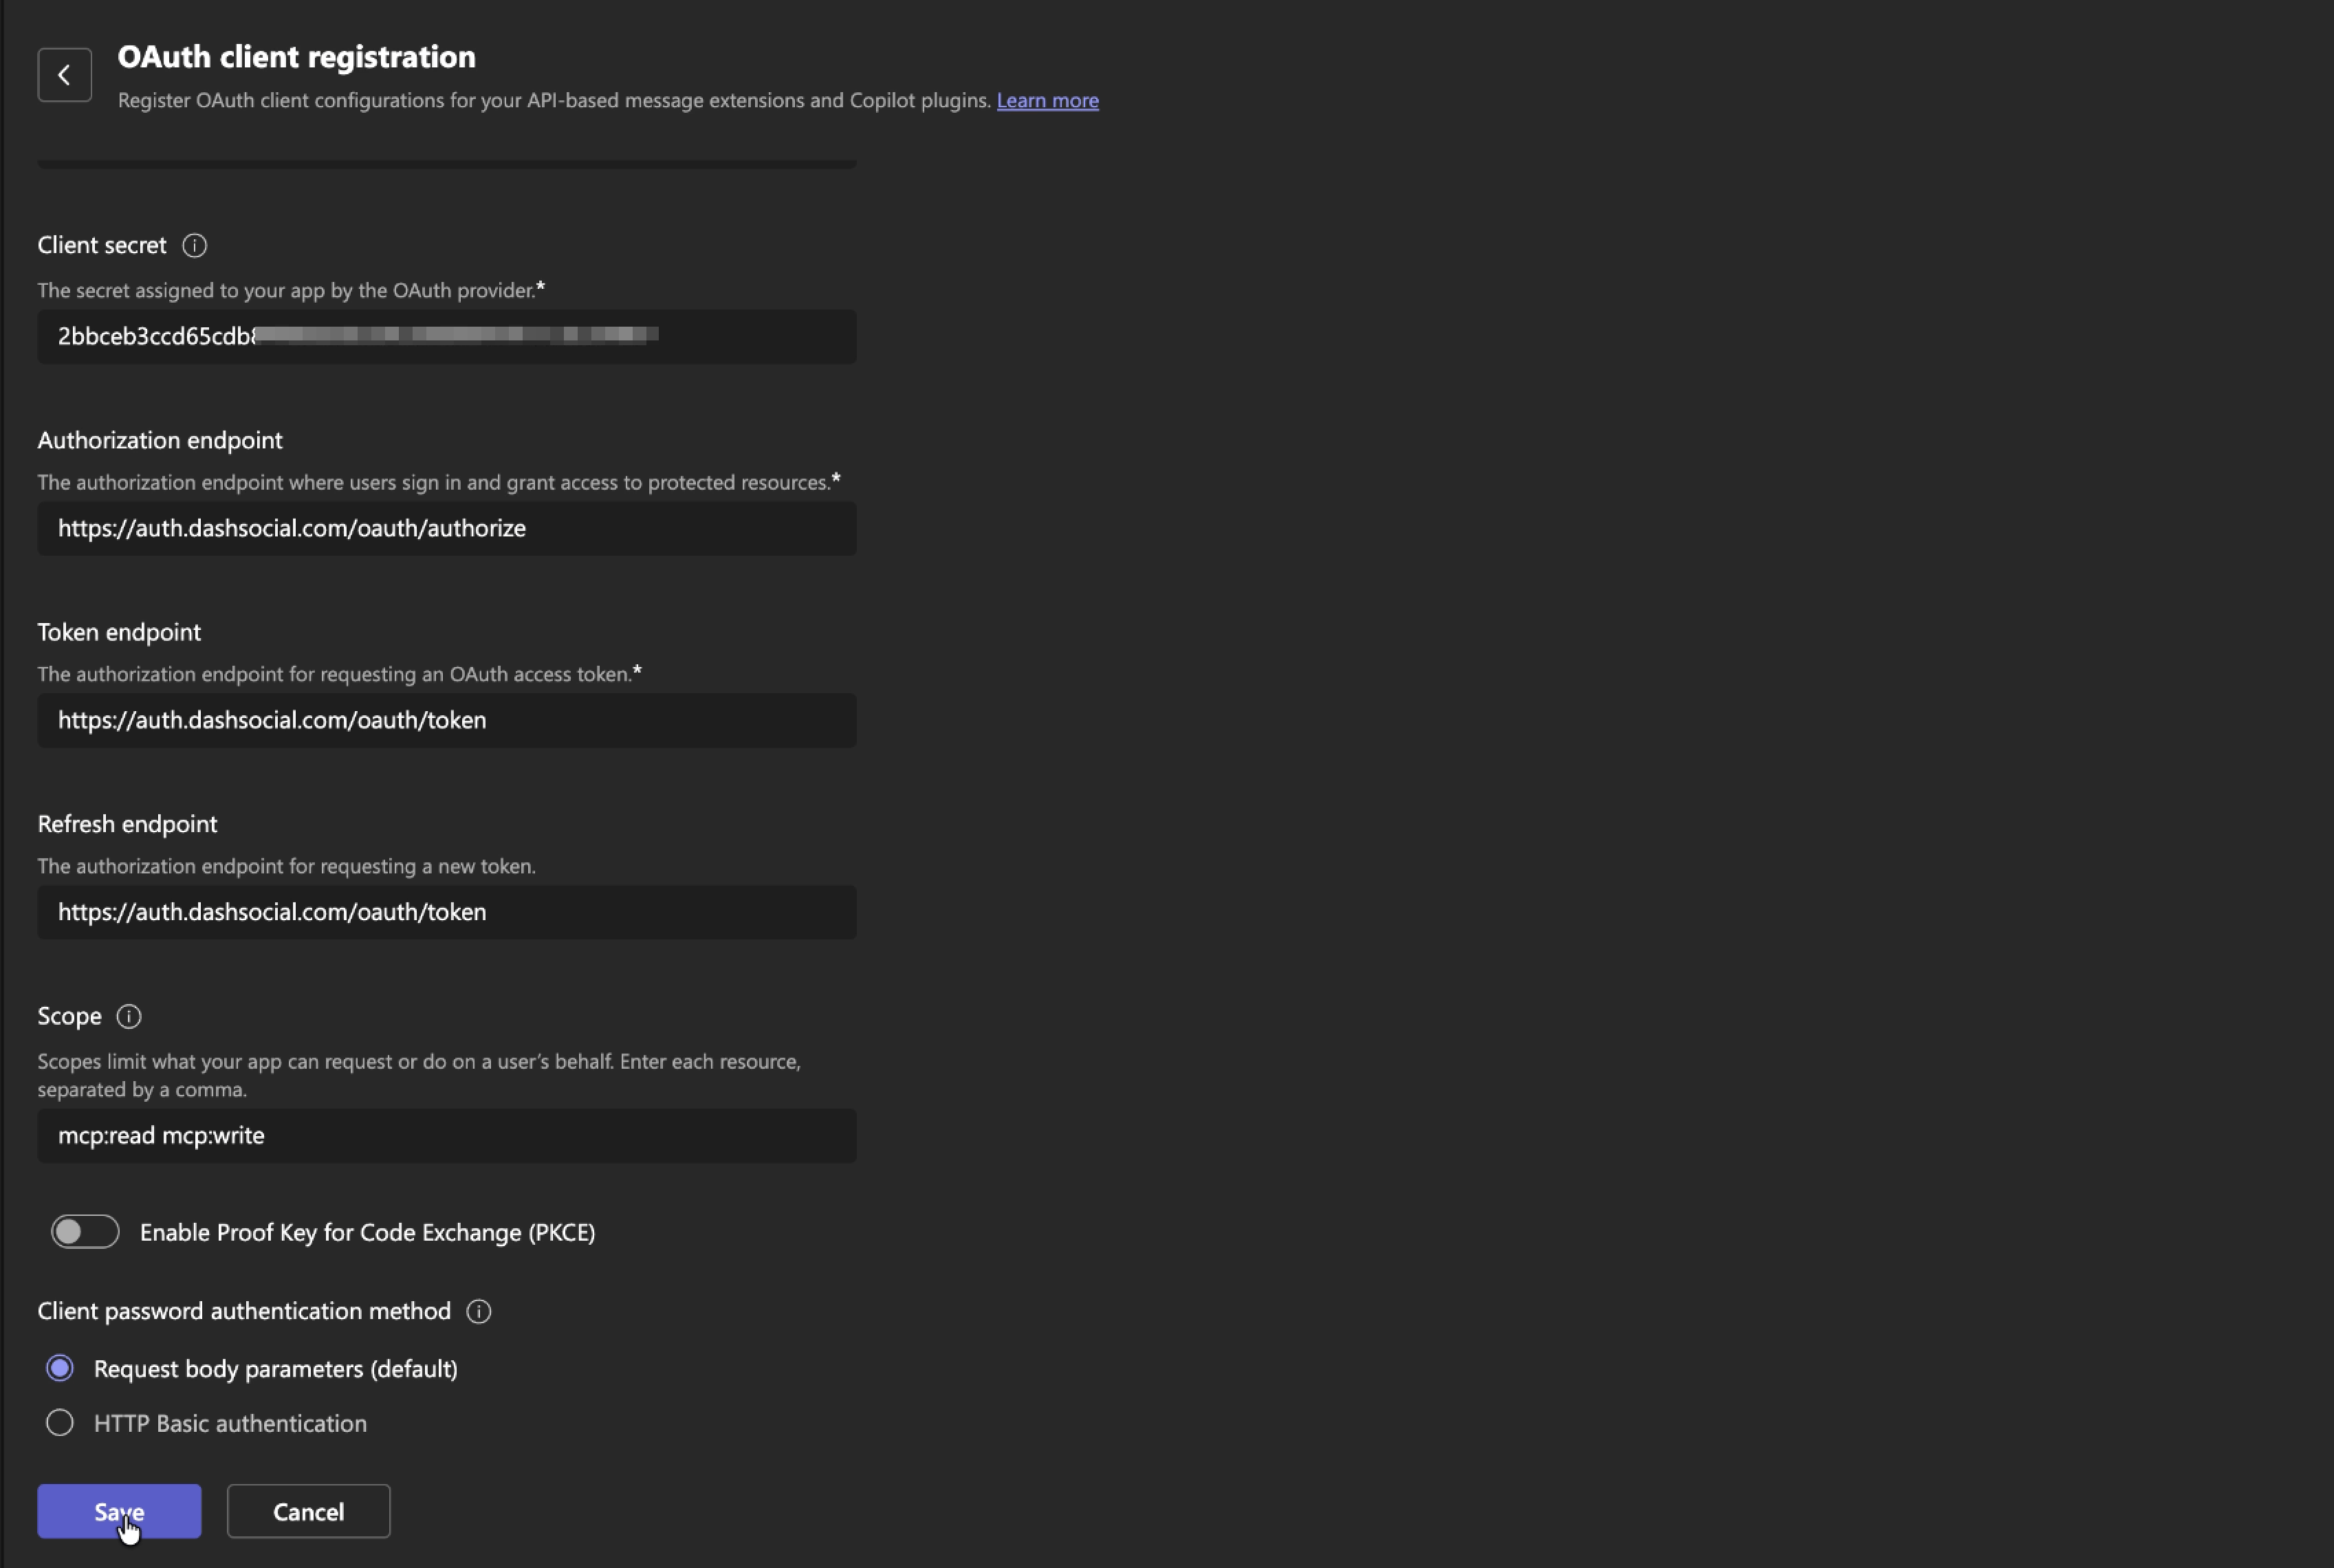 Save the registration. Copy the registration client ID it generates.
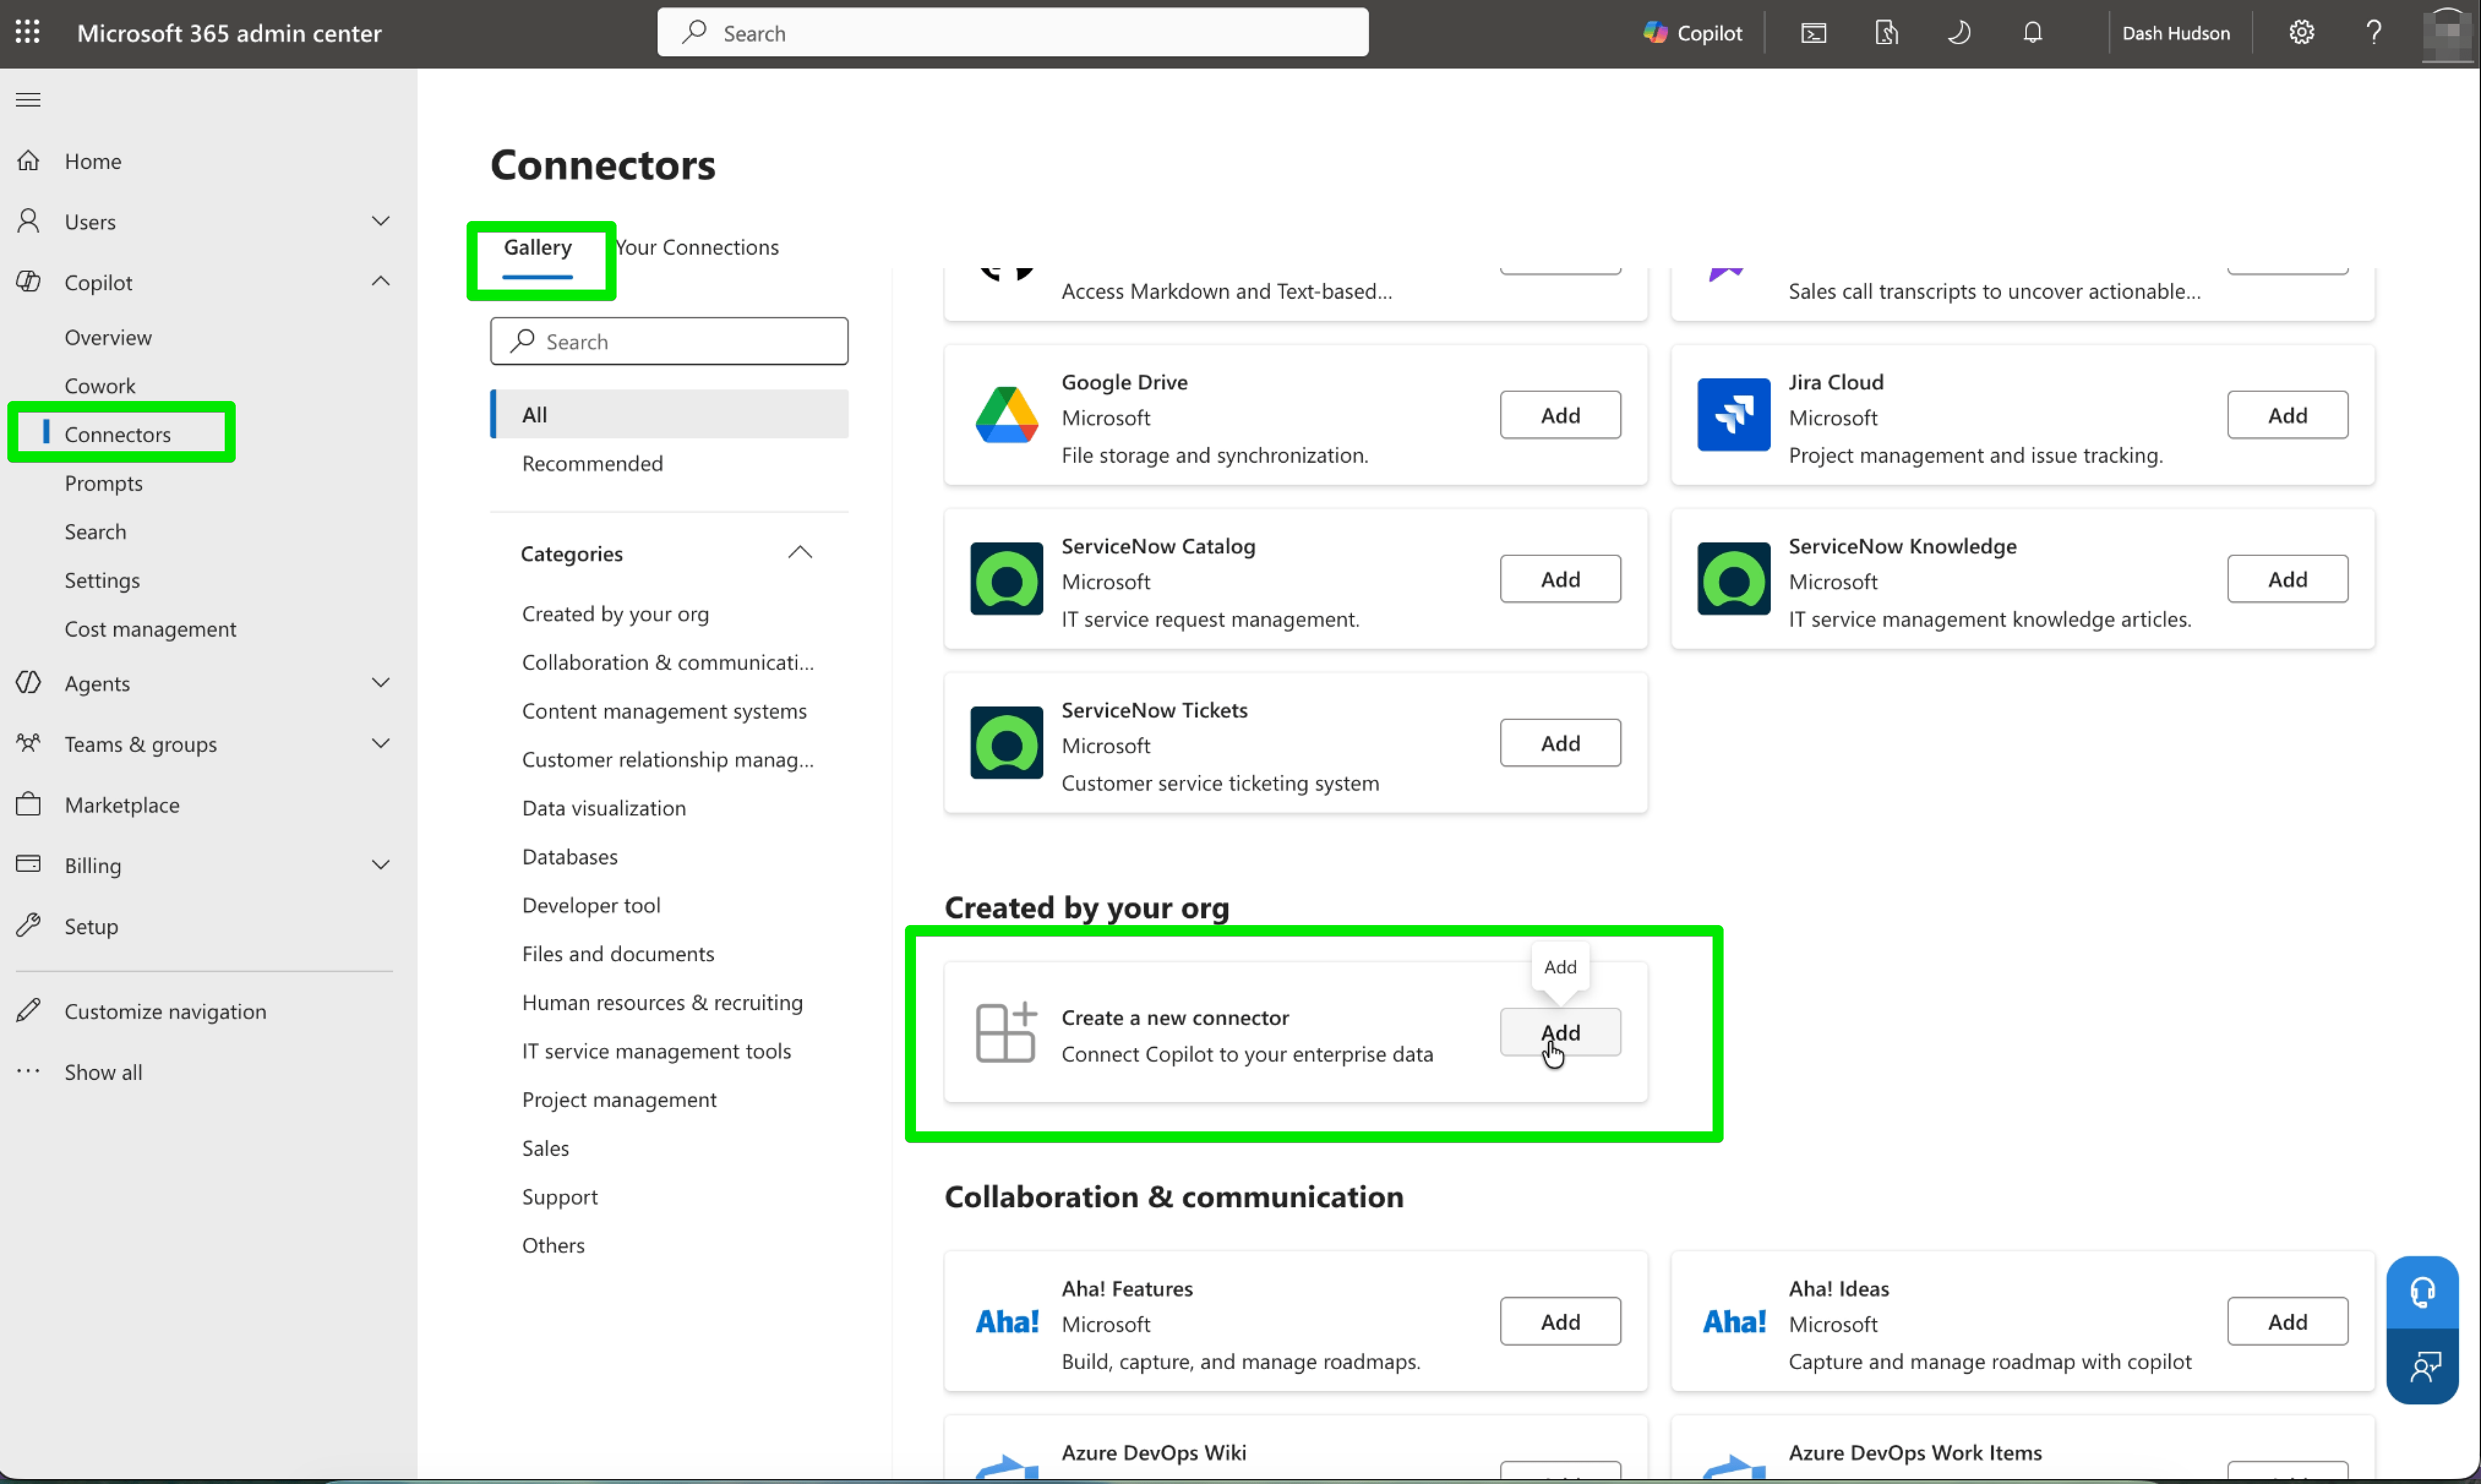
 Go to **Copilot administration** → **Connectors** → **Gallery** → **Create a new connector**, then choose **Connect to MCP server**.
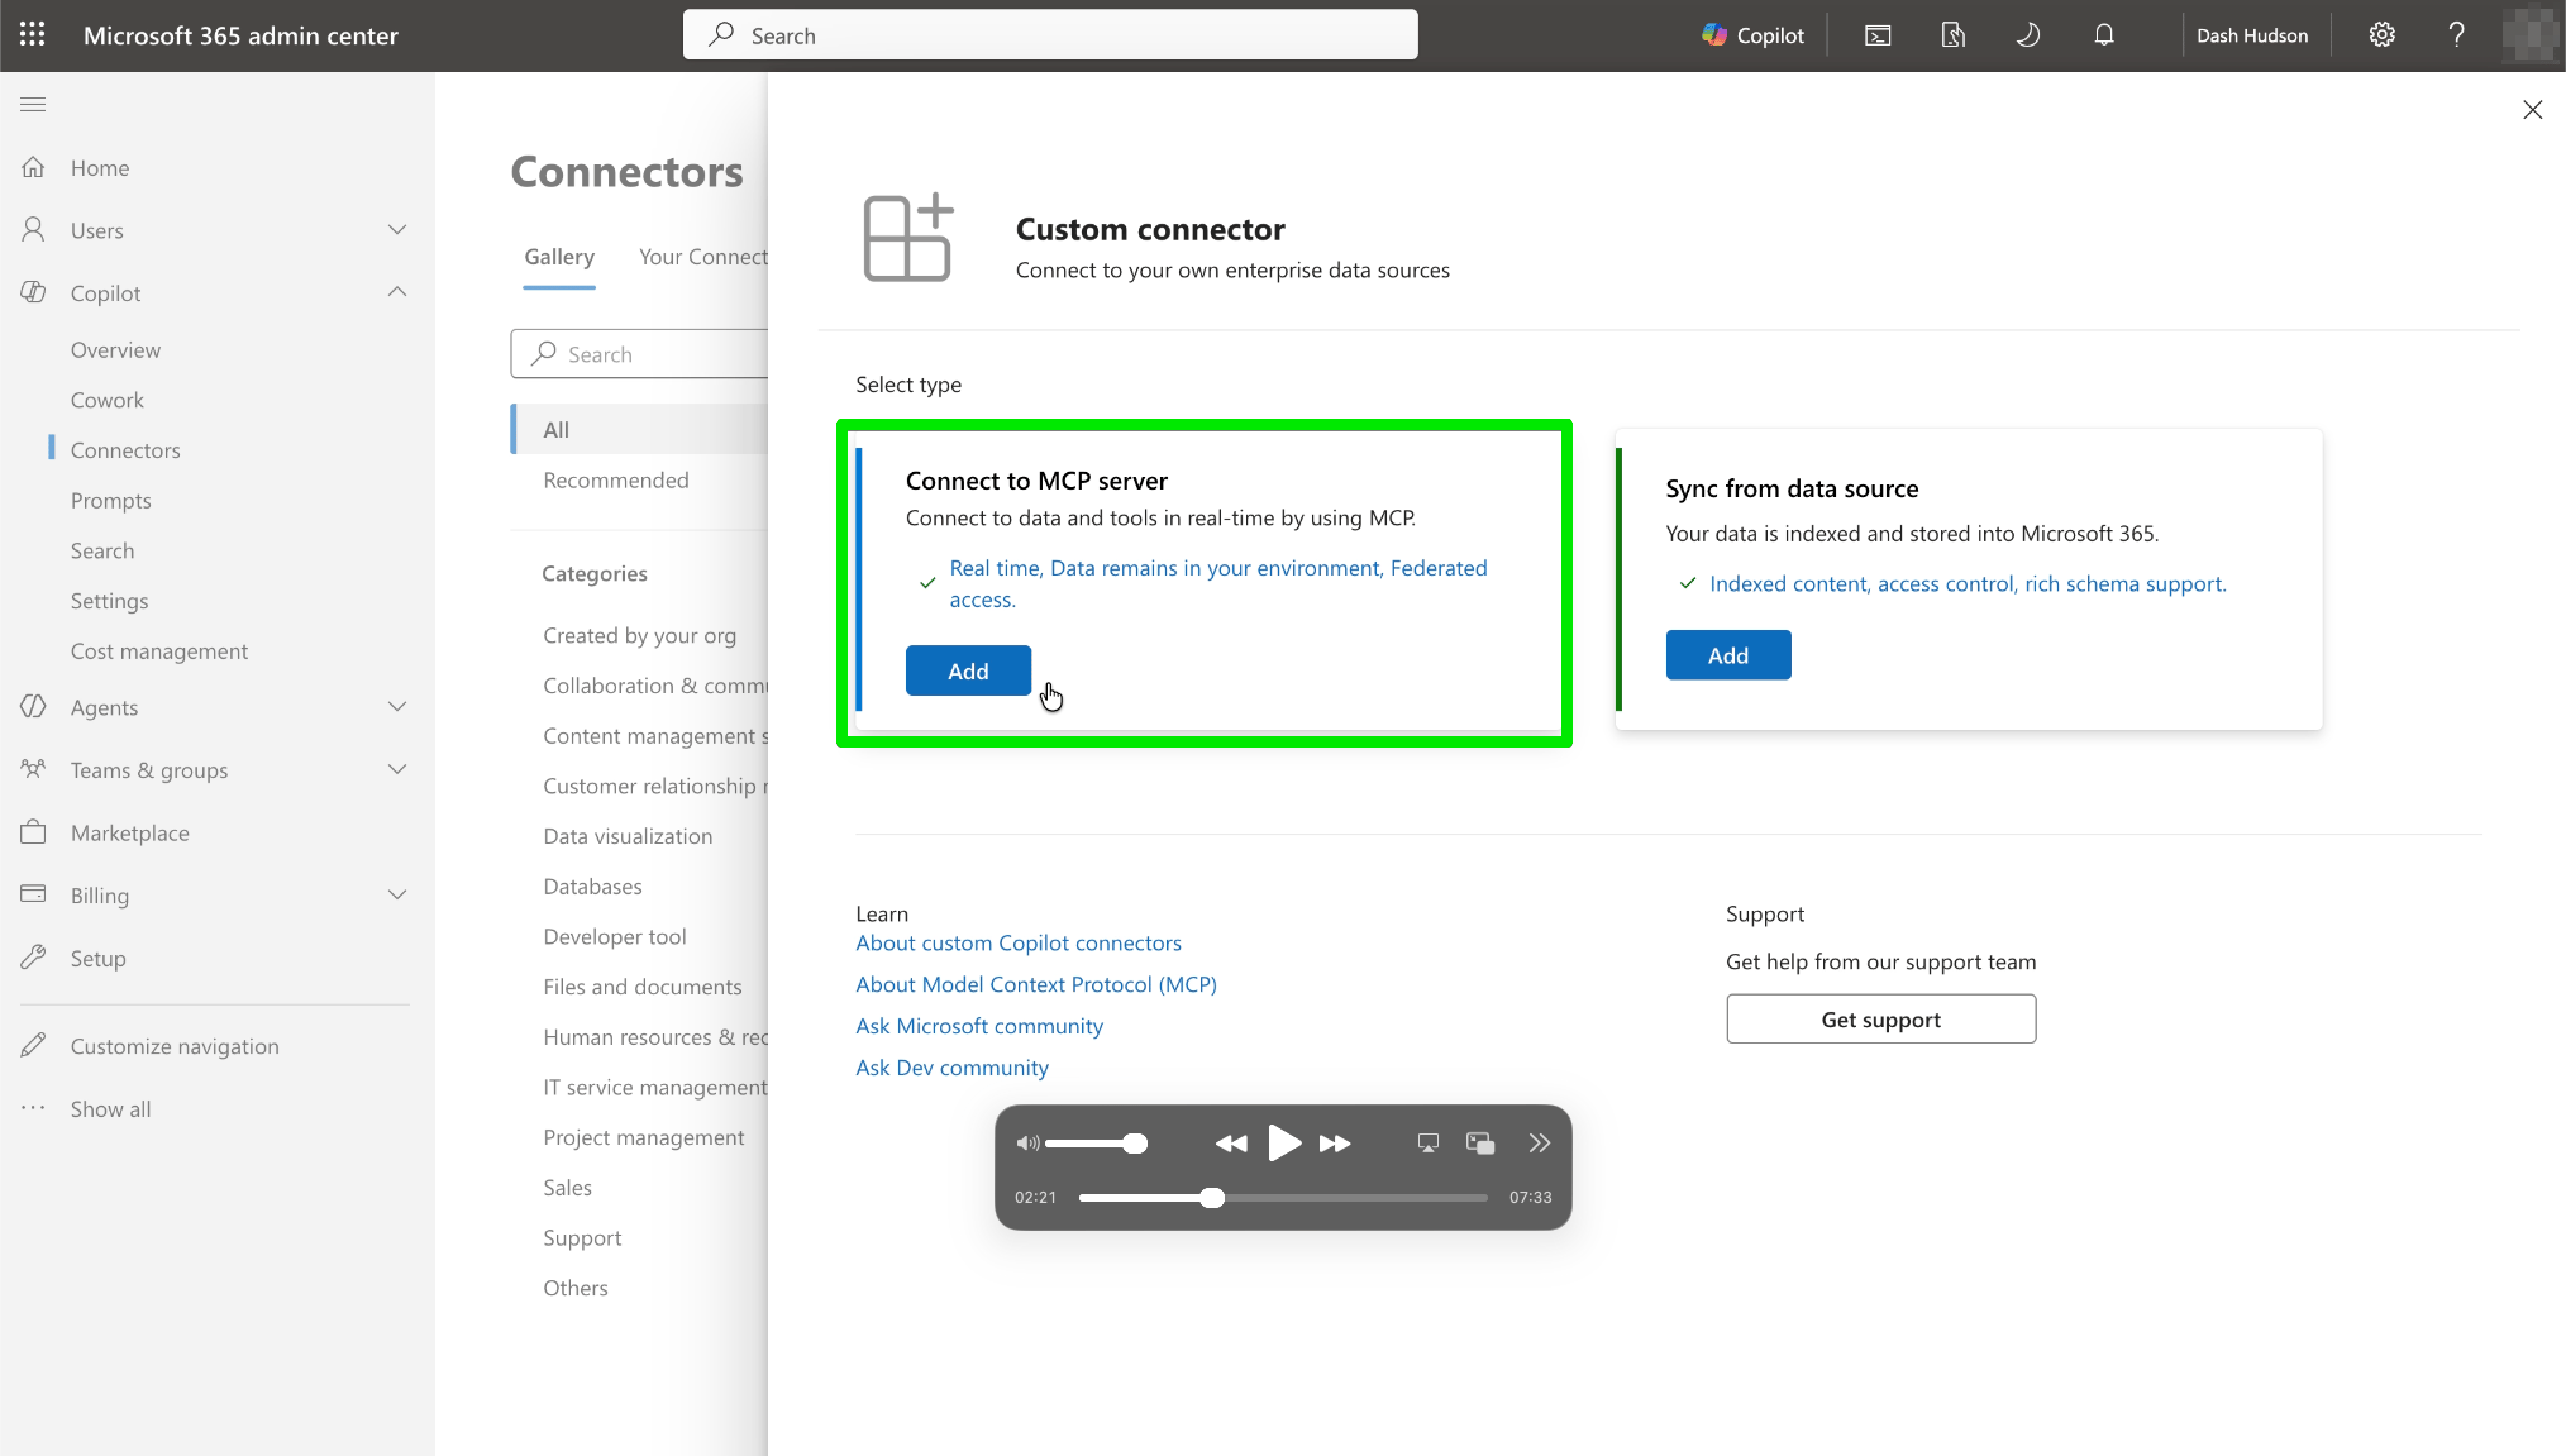 Name it "Dash Social MCP", enter the server URL again, and set the authentication method to **OAuth 2**. For **Reference ID**, paste the registration client ID you copied earlier.
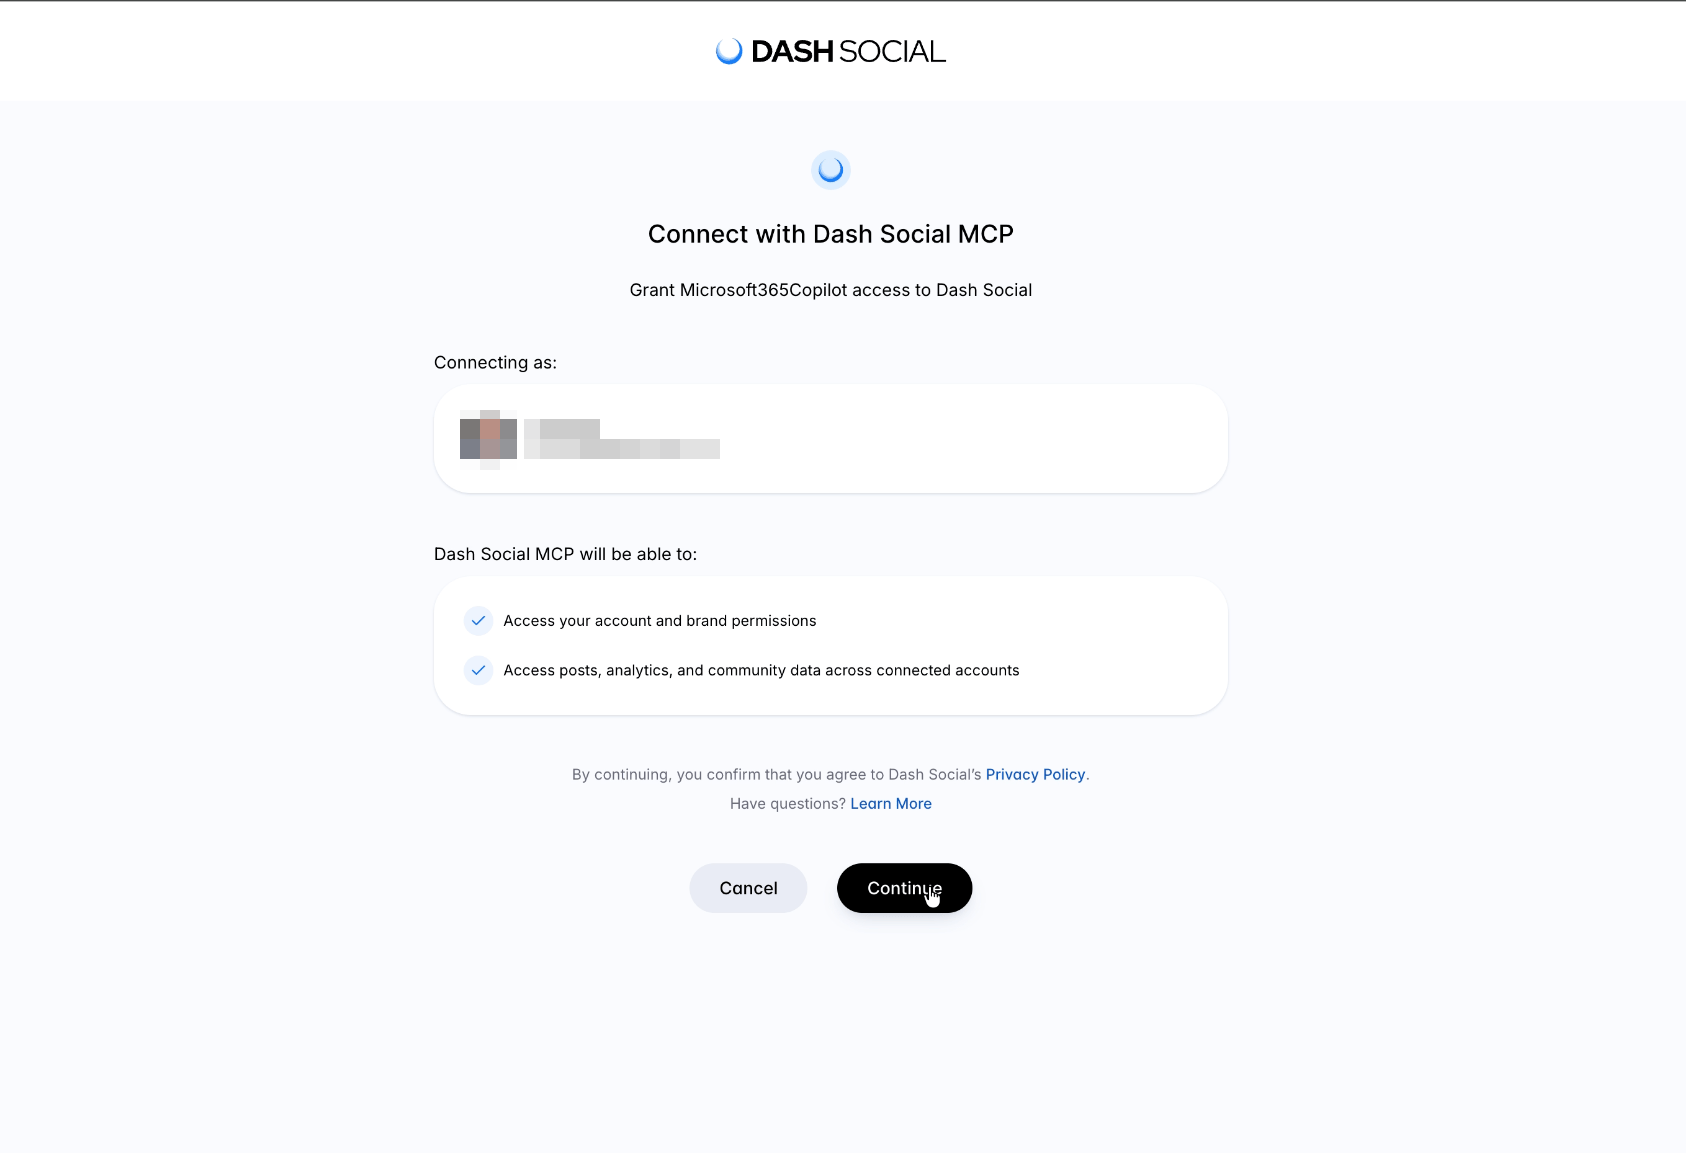
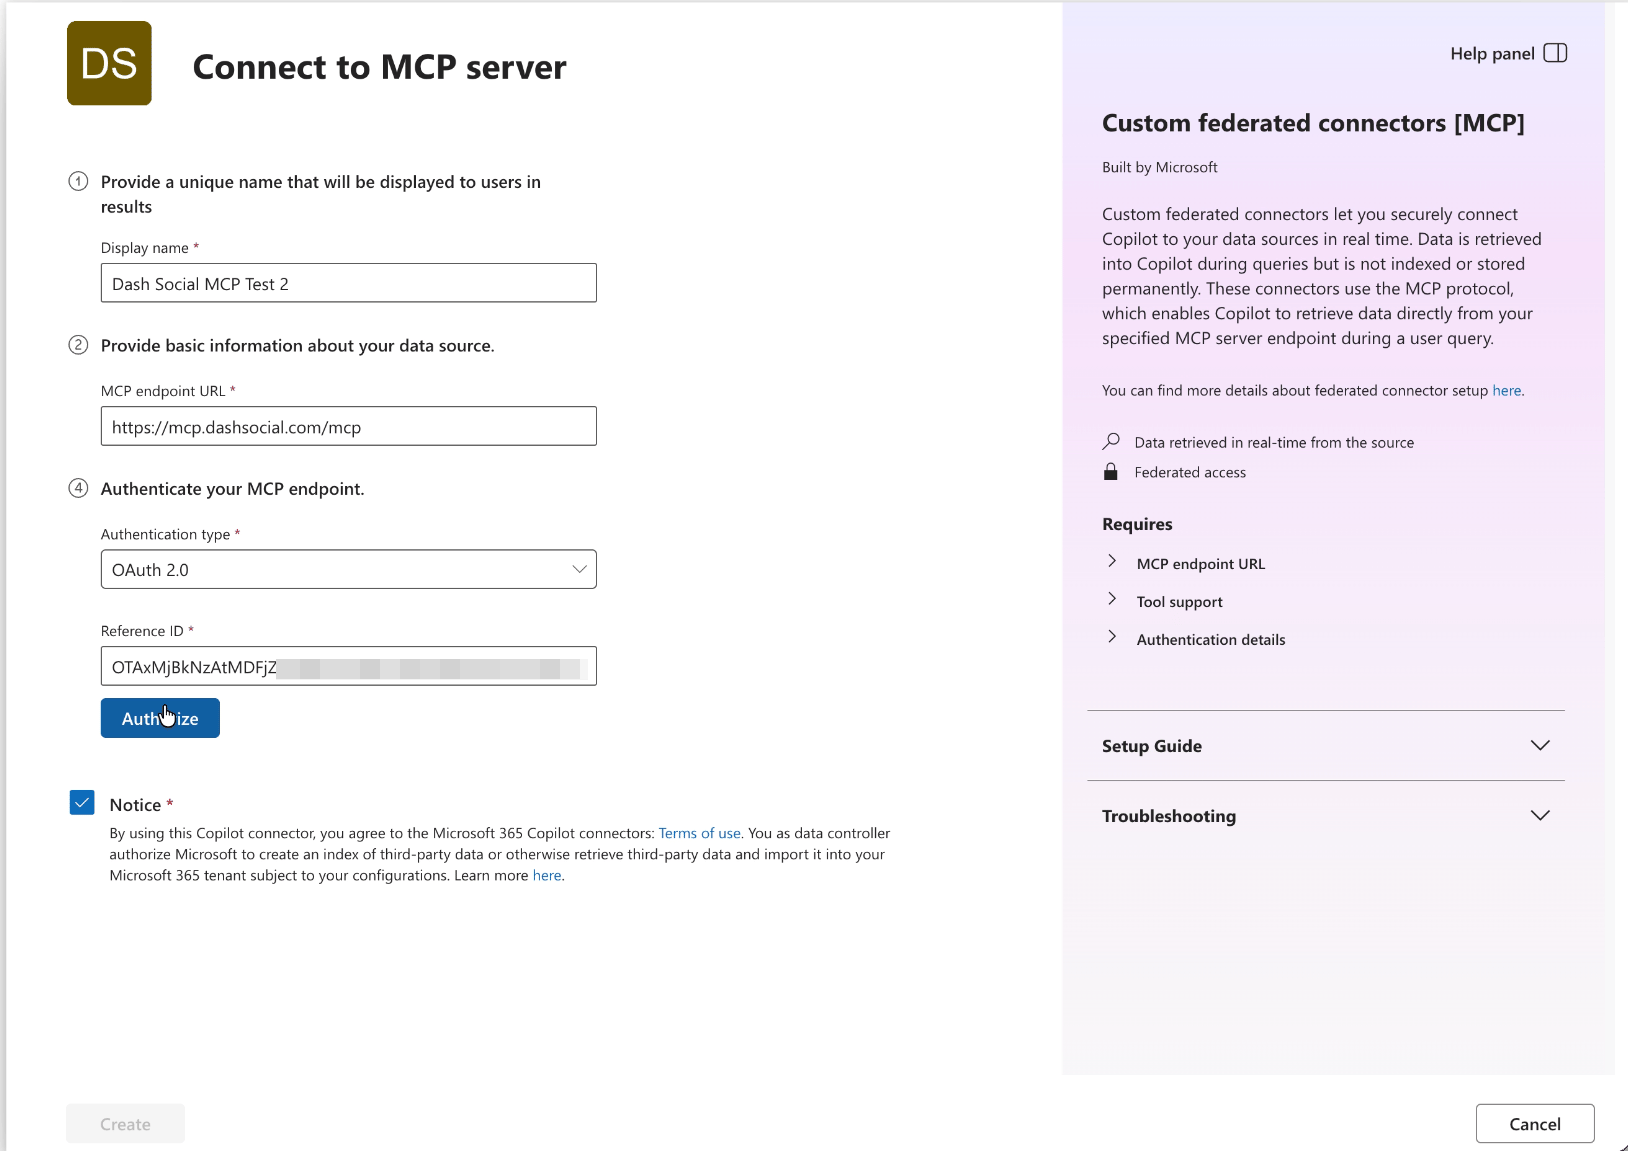 Click **Authorize** and sign in to Dash Social when prompted, then click **Create** to finish. The connection is now created and available to your organization.
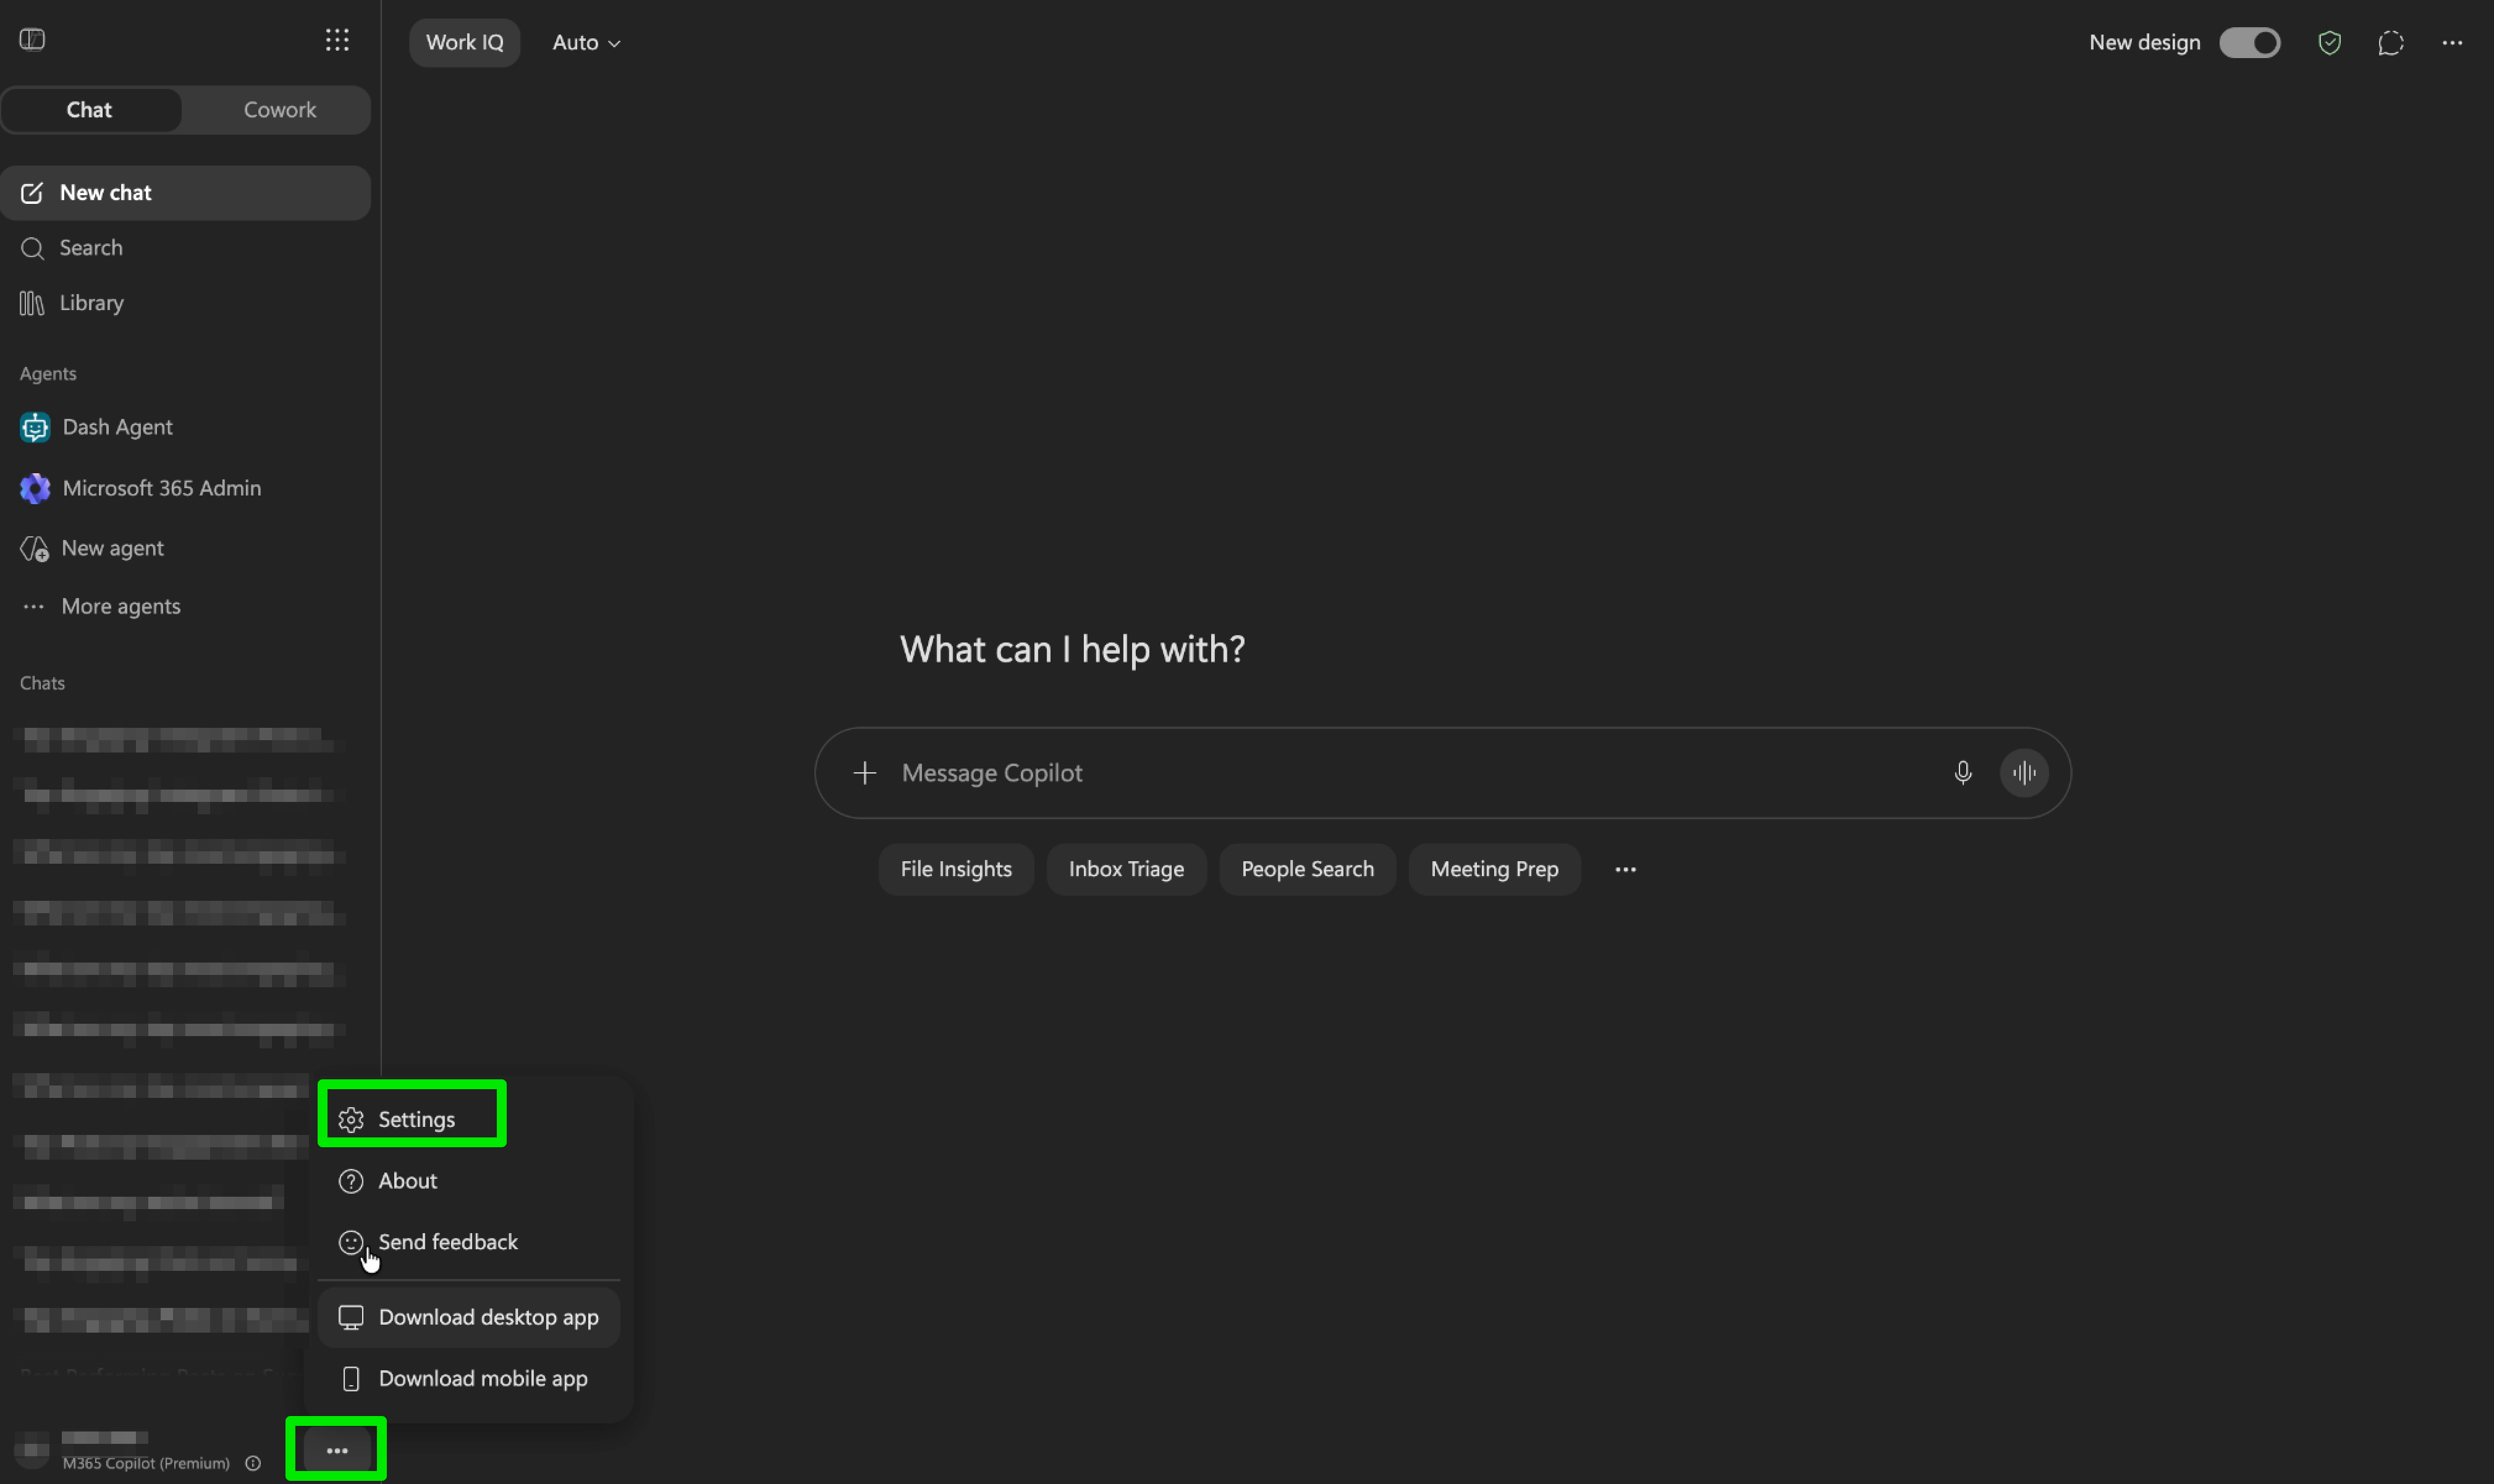
 ### Part 2: User setup
In Microsoft 365 Copilot, open the settings pane and go to **Sources**.
### Part 2: User setup
In Microsoft 365 Copilot, open the settings pane and go to **Sources**.
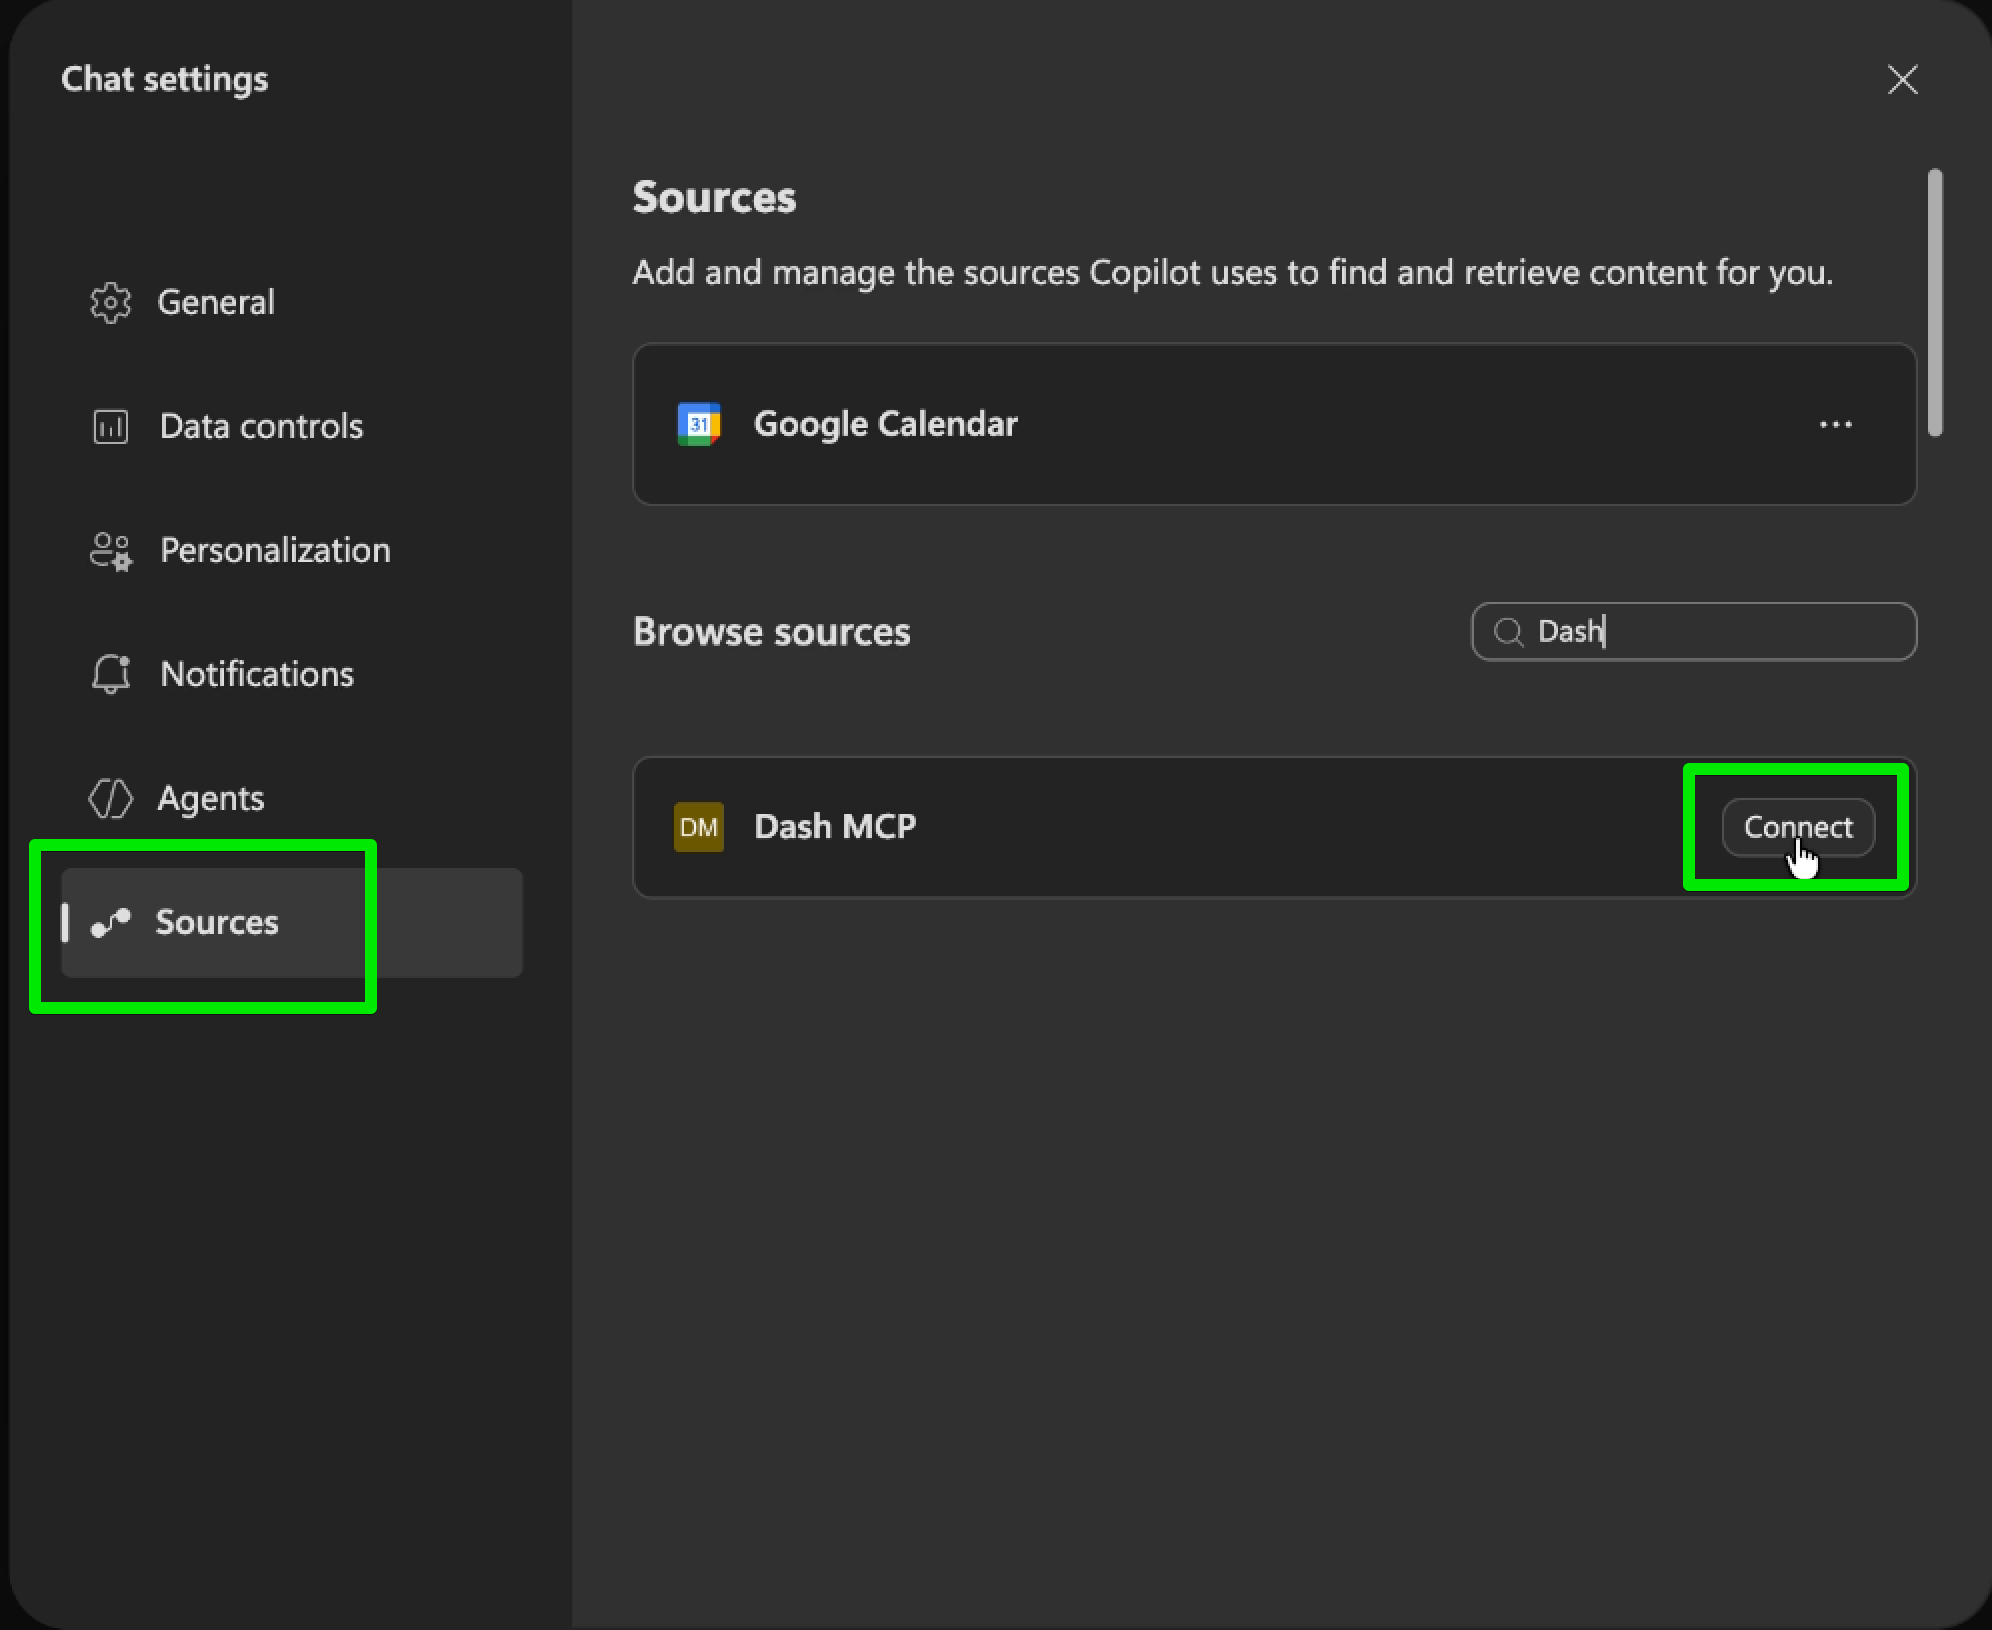
 Search for "Dash", select the Dash Social MCP connector, and click **Connect**. In the confirmation dialog, click **Continue to Dash MCP**.
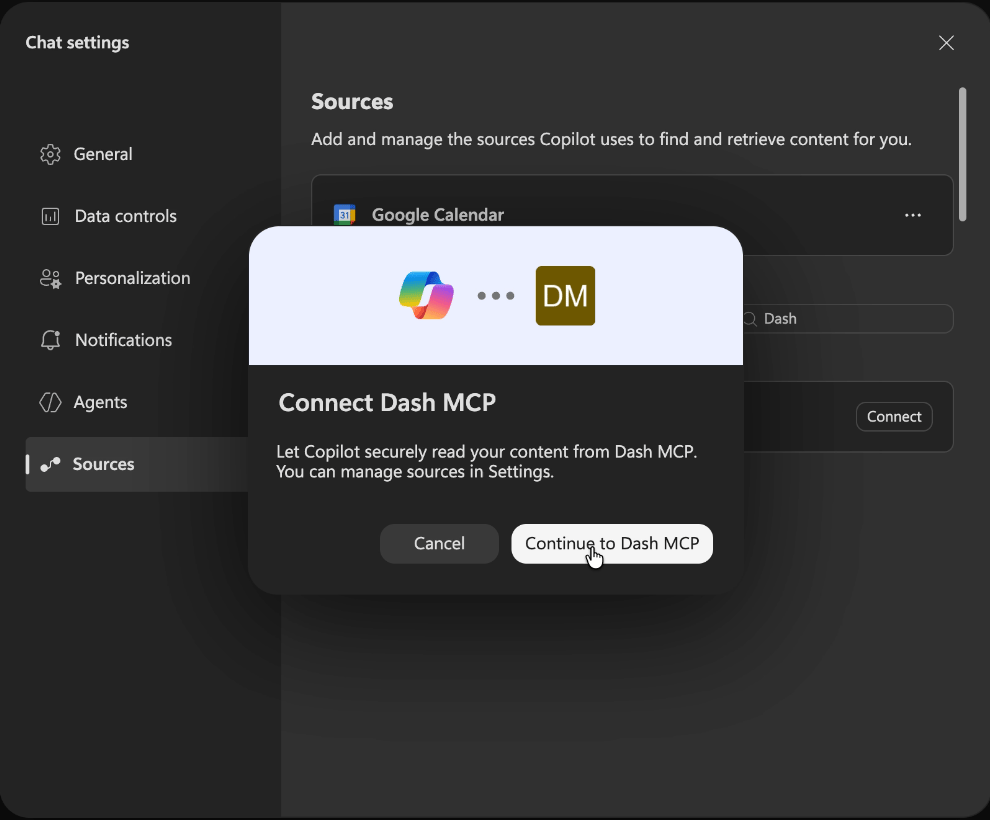 Complete the authentication prompt to link your Dash Social account, then close the settings pane.
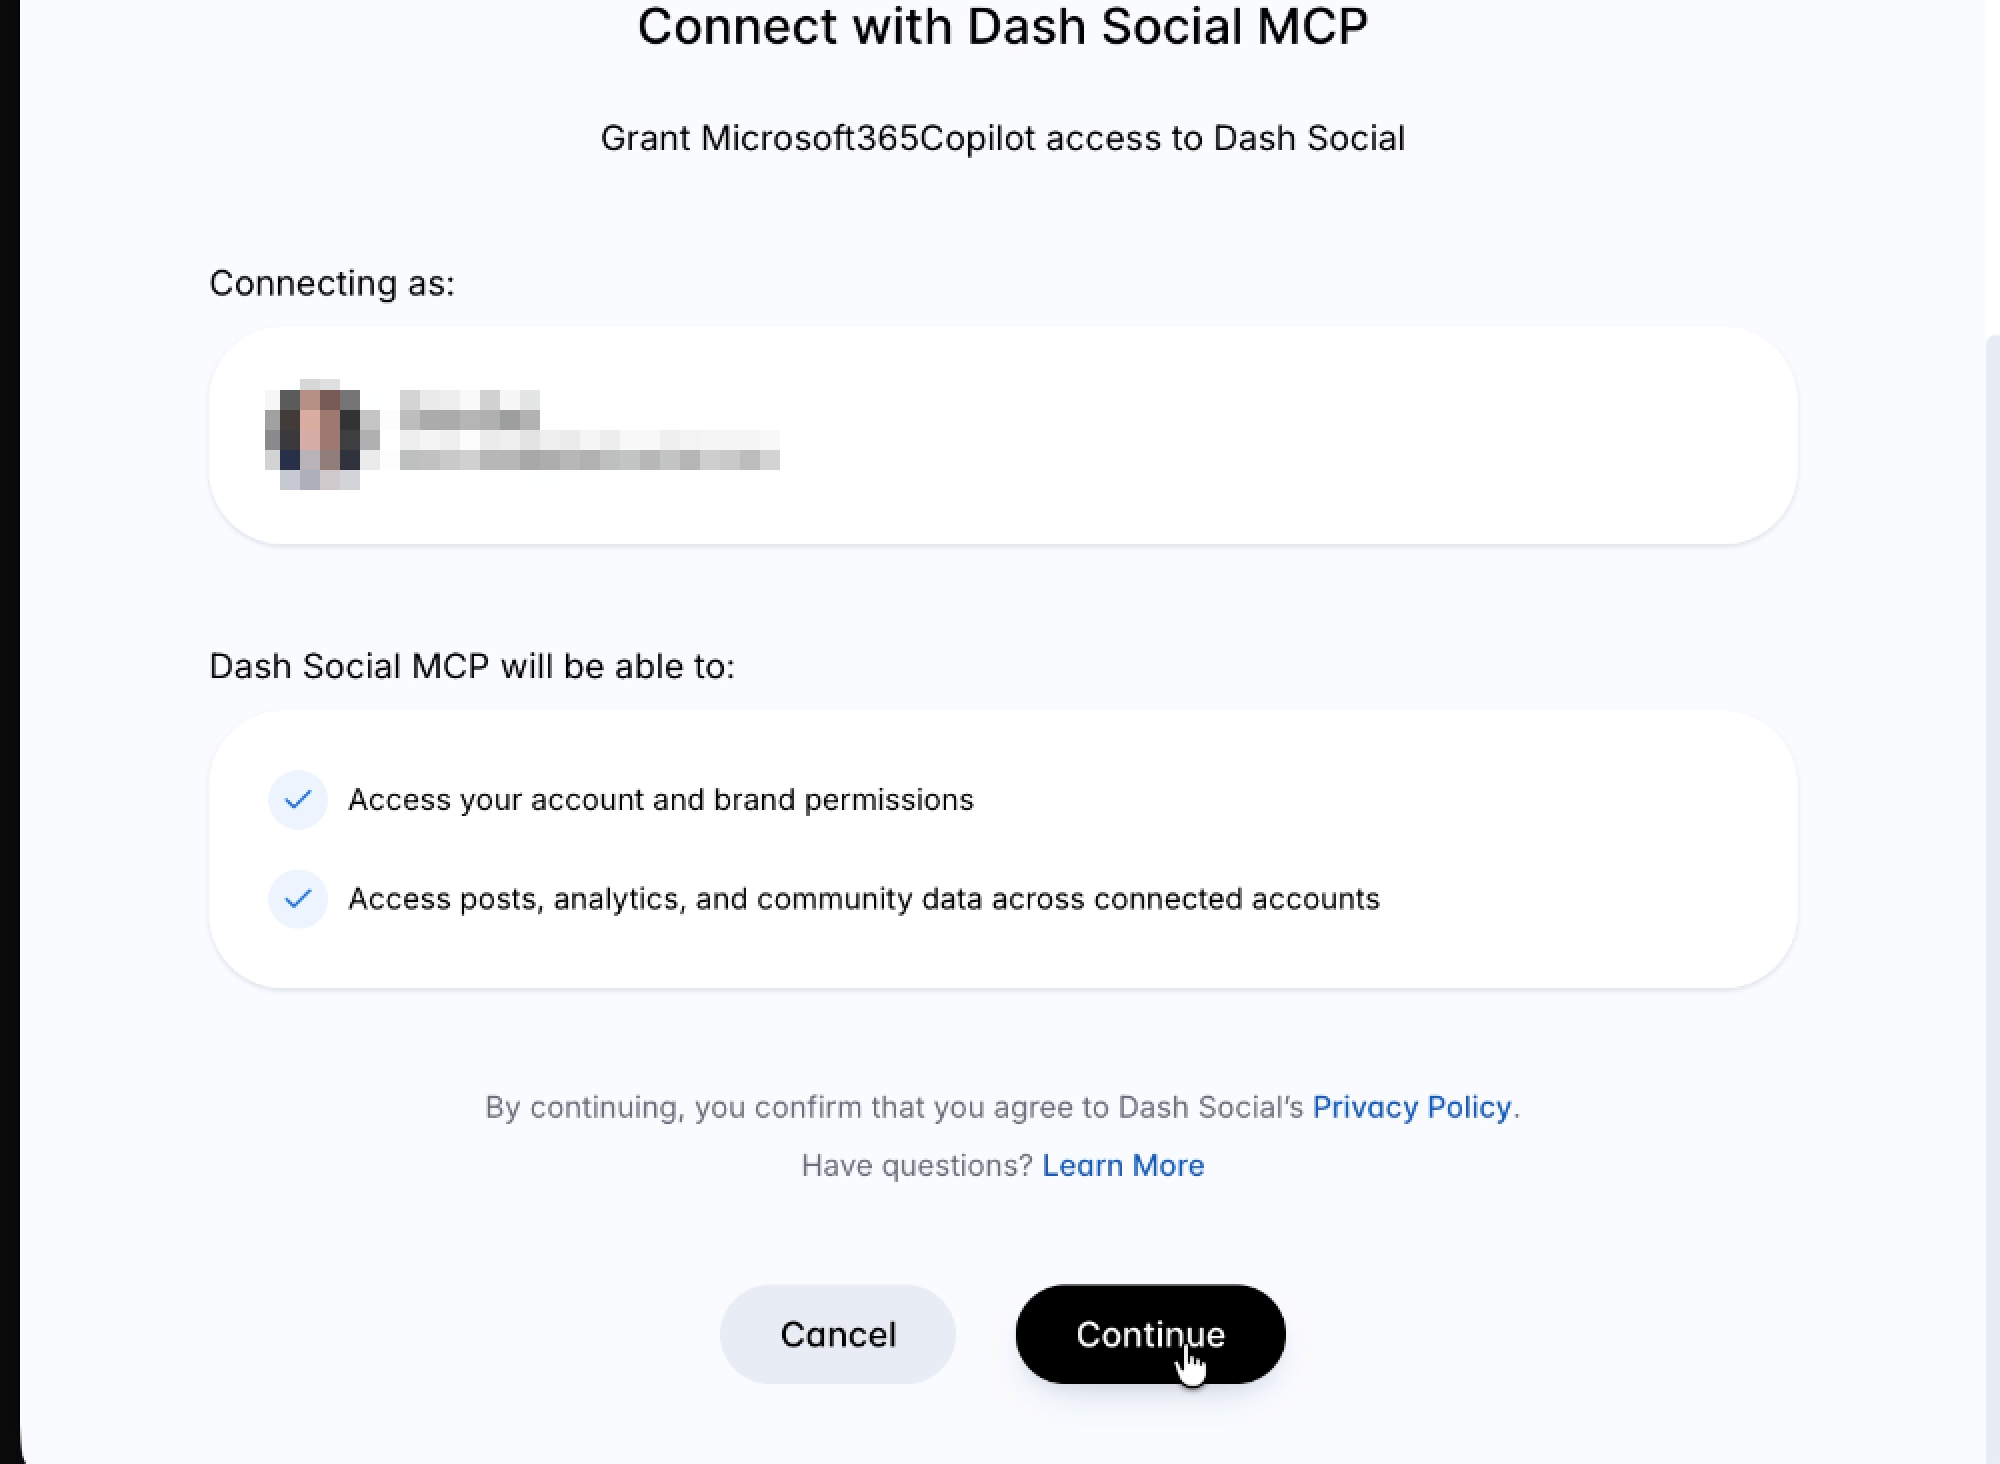 The Dash Social tools are now available in your conversations.
Most clients that support MCP servers with OAuth will be able to connect to the Dash MCP. These are instructions to connect any tool.
Look for an MCP, connectors, or integrations section in the client's settings, or an MCP config file if it is configured through JSON. Check your client's documentation for the exact location.
Name it "Dash Social MCP" and paste the server URL above. For clients that use a config file, add:
```json theme={null}
{
"mcpServers": {
"dash-social": {
"url": "https://mcp.dashsocial.com/mcp"
}
}
}
```
Complete the authentication prompt to link your Dash Social account. If you edited a config file, restart the client first.
For clients that only support local servers, use a remote bridge such as `mcp-remote` pointed at the server URL.
For clients that only support local servers, use a remote bridge such as `mcp-remote` pointed at the URL.
***
## Tips for Better Results
Now that you’re connected, here’are a few tips to help you get faster, more accurate answers:
* **Mention your brand by name.** If you have access to multiple brands, mention which one you're asking about. For example: "Show me engagement for Adore Collective last month."
* **Specify your time frame.** Include dates or time periods in your questions. For example: "What was our Instagram reach in March?" or "Show me trends over the past 90 days."
* **Set up your tracked competitors first.** You can only compare against competitors that are already tracked in your Dash Social account. If a competitor isn't showing up, check that they're added in Settings.
### Allow access to media
Ask Claude to create a PowerPoint, Word doc, or PDF that includes thumbnails of your posts, or to upload new media into your Dash library. Both need permission for Claude to access Dash's image hosting. Here's how:
Go to **Settings → Capabilities**. On Team or Enterprise plans, look for **Organization settings → Capabilities** instead.
Toggle **Code execution and file creation** on, then toggle **Allow network egress** on.
Under **Additional allowed domains**, enter `*.dashsocial.com` and click **Add**.
The Dash Social tools are now available in your conversations.
Most clients that support MCP servers with OAuth will be able to connect to the Dash MCP. These are instructions to connect any tool.
Look for an MCP, connectors, or integrations section in the client's settings, or an MCP config file if it is configured through JSON. Check your client's documentation for the exact location.
Name it "Dash Social MCP" and paste the server URL above. For clients that use a config file, add:
```json theme={null}
{
"mcpServers": {
"dash-social": {
"url": "https://mcp.dashsocial.com/mcp"
}
}
}
```
Complete the authentication prompt to link your Dash Social account. If you edited a config file, restart the client first.
For clients that only support local servers, use a remote bridge such as `mcp-remote` pointed at the server URL.
For clients that only support local servers, use a remote bridge such as `mcp-remote` pointed at the URL.
***
## Tips for Better Results
Now that you’re connected, here’are a few tips to help you get faster, more accurate answers:
* **Mention your brand by name.** If you have access to multiple brands, mention which one you're asking about. For example: "Show me engagement for Adore Collective last month."
* **Specify your time frame.** Include dates or time periods in your questions. For example: "What was our Instagram reach in March?" or "Show me trends over the past 90 days."
* **Set up your tracked competitors first.** You can only compare against competitors that are already tracked in your Dash Social account. If a competitor isn't showing up, check that they're added in Settings.
### Allow access to media
Ask Claude to create a PowerPoint, Word doc, or PDF that includes thumbnails of your posts, or to upload new media into your Dash library. Both need permission for Claude to access Dash's image hosting. Here's how:
Go to **Settings → Capabilities**. On Team or Enterprise plans, look for **Organization settings → Capabilities** instead.
Toggle **Code execution and file creation** on, then toggle **Allow network egress** on.
Under **Additional allowed domains**, enter `*.dashsocial.com` and click **Add**.
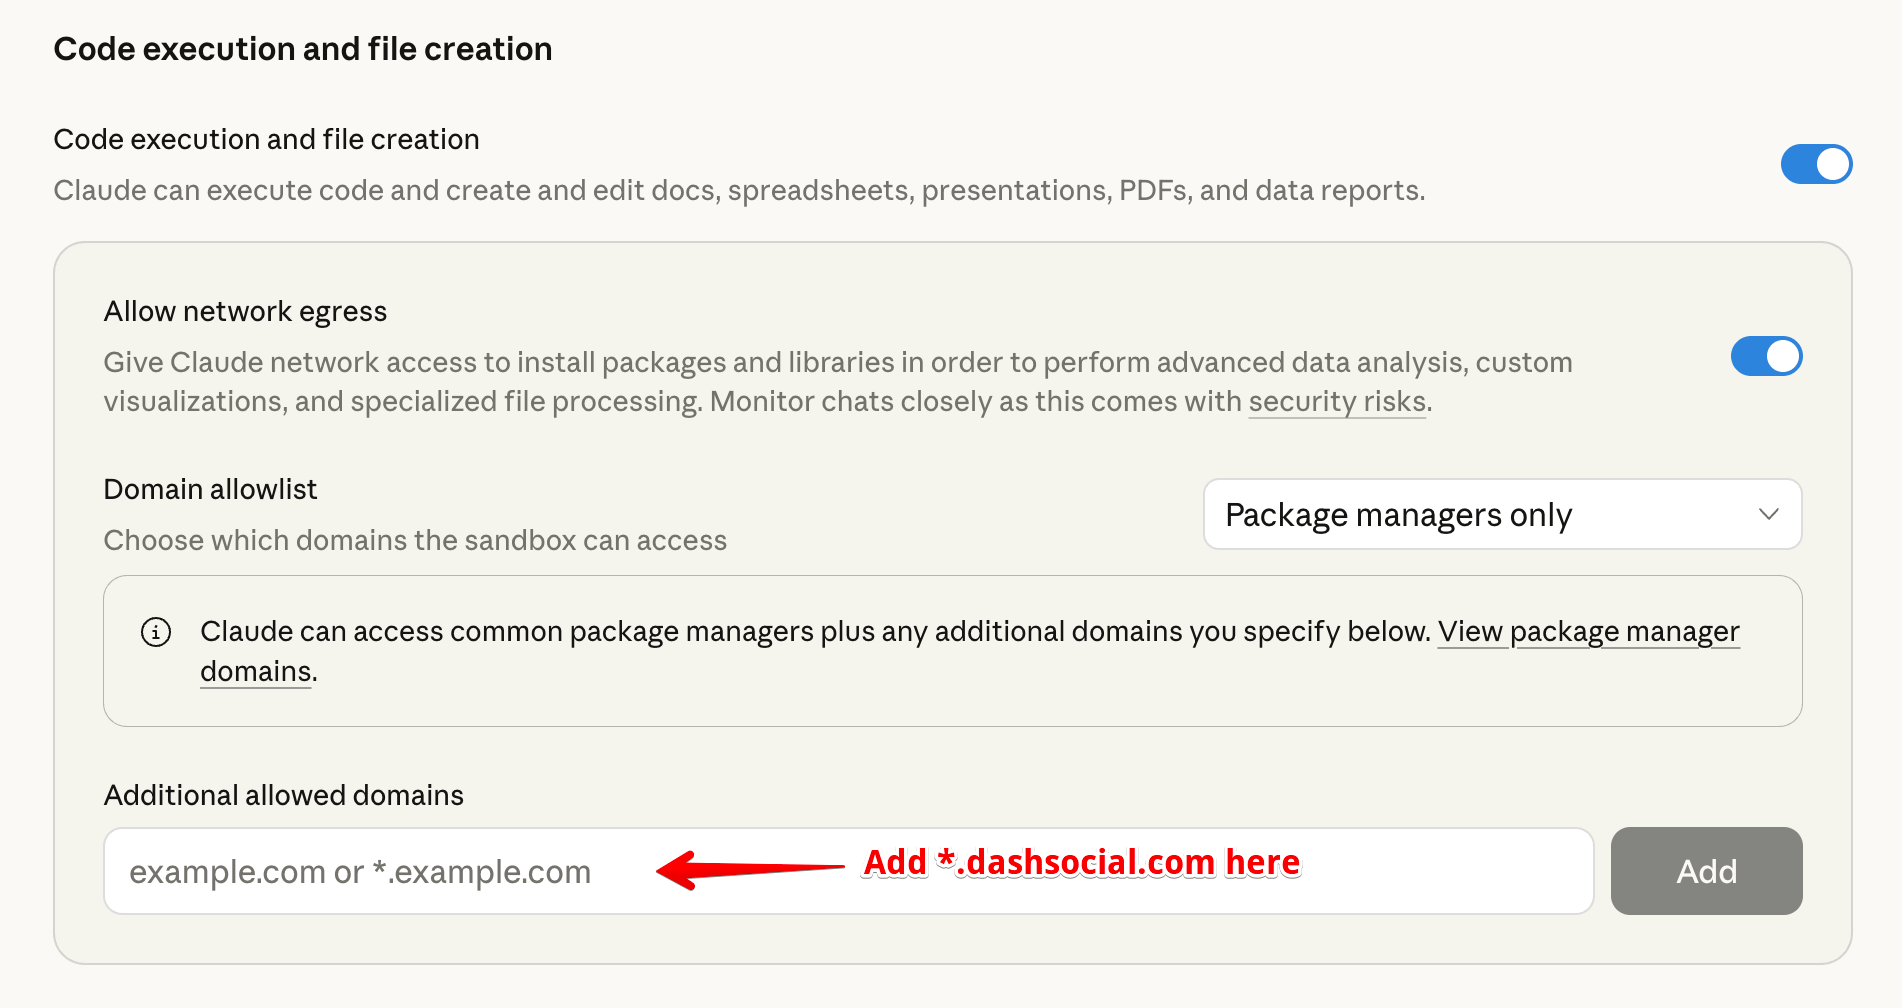 On Team and Enterprise plans, only an organization owner can change these settings. If the option is greyed out, ask your admin to add `*.dashsocial.com` to the allowlist.
***
## Frequently Asked Questions
**Q. Which AI tools does the Dash Social MCP work with?**
A. The Dash Social MCP is built on an open standard, meaning it's compatible with any AI platform that supports MCP. Popular options include ChatGPT and Claude.
**Q. What data can my AI assistant access through the Dash Social MCP?**
A. Your AI assistant can only access the brands and features you already have permissions for in Dash. You can control which brands are accessible by contacting your Dash Social admin.
**Q. My authentication expired. What should I do?**
A. Go back to your AI assistant's connector settings and reconnect the Dash Social MCP. You'll need to complete the authentication prompt again to re-link your account.
***
## Troubleshooting
**"You don't have MCP access for this brand"**
MCP access needs to be enabled for each brand separately. During authentication, you'll choose which brands can be accessed by your AI assistant. The MCP only grants the permissions you already have in Dash, so your brand data stays in your control. Even if you can see the brand in Dash Social, you may not have MCP access yet. Please contact your account representative to enable it.
**“Can't find the metric you're looking for”**
Try asking for one metric at a time using the same terms you see in Dash Social. If you're still not getting results, rephrase your question or ask the AI what metrics are available.
**If results are empty or you’re missing data**
Check that your brand actually published content during the time period you asked about. Empty results usually mean there was no activity to report.
**Media thumbnails won't embed in my PowerPoint, doc, or PDF**
Claude needs permission to download images from Dash. Add `*.dashsocial.com` to your allowlist under **Settings → Capabilities → Allow network egress** (see [Allow access to media](#allow-access-to-media) above). On Team and Enterprise plans, an organization owner has to make this change.
**I can't upload media to Dash from Claude**
Claude needs permission to upload images to Dash. Add `*.dashsocial.com` to your allowlist under Settings → Capabilities → Allow network egress (see [Allow access to media](#allow-access-to-media)). On Team and Enterprise plans, an organization owner has to make this change.
On Team and Enterprise plans, only an organization owner can change these settings. If the option is greyed out, ask your admin to add `*.dashsocial.com` to the allowlist.
***
## Frequently Asked Questions
**Q. Which AI tools does the Dash Social MCP work with?**
A. The Dash Social MCP is built on an open standard, meaning it's compatible with any AI platform that supports MCP. Popular options include ChatGPT and Claude.
**Q. What data can my AI assistant access through the Dash Social MCP?**
A. Your AI assistant can only access the brands and features you already have permissions for in Dash. You can control which brands are accessible by contacting your Dash Social admin.
**Q. My authentication expired. What should I do?**
A. Go back to your AI assistant's connector settings and reconnect the Dash Social MCP. You'll need to complete the authentication prompt again to re-link your account.
***
## Troubleshooting
**"You don't have MCP access for this brand"**
MCP access needs to be enabled for each brand separately. During authentication, you'll choose which brands can be accessed by your AI assistant. The MCP only grants the permissions you already have in Dash, so your brand data stays in your control. Even if you can see the brand in Dash Social, you may not have MCP access yet. Please contact your account representative to enable it.
**“Can't find the metric you're looking for”**
Try asking for one metric at a time using the same terms you see in Dash Social. If you're still not getting results, rephrase your question or ask the AI what metrics are available.
**If results are empty or you’re missing data**
Check that your brand actually published content during the time period you asked about. Empty results usually mean there was no activity to report.
**Media thumbnails won't embed in my PowerPoint, doc, or PDF**
Claude needs permission to download images from Dash. Add `*.dashsocial.com` to your allowlist under **Settings → Capabilities → Allow network egress** (see [Allow access to media](#allow-access-to-media) above). On Team and Enterprise plans, an organization owner has to make this change.
**I can't upload media to Dash from Claude**
Claude needs permission to upload images to Dash. Add `*.dashsocial.com` to your allowlist under Settings → Capabilities → Allow network egress (see [Allow access to media](#allow-access-to-media)). On Team and Enterprise plans, an organization owner has to make this change.